"WINDSHIELD WASHER SYSTEM UPGRADE"
or
"See Where You are Going!"

An Article by Stu Brennan
May, 2002
Preface: Stu is a regular contributor to our pages, and this one is a gem. Ever try getting that 100 point Tudor windshield washer to actually put some water on your windshield? Had physical therapy on your left (right for GB) thumb from uselessly pumping that dash knob? Well, here is the solution. Convert to an electric pump without altering the dash look!!! Besides, it works against dirt, bugs, ice, and if you aim it correctly, that noisy rice burner on rubber bands with the 1,000 watt boom-box next to you.
Editor
The State Inspection guy said he would overlook my Tiger’s nonfunctional windshield washer THIS time, but I might get rejected in the future. And of course there was the safety issue, since the ability to quickly clear the windshield can be important at times. I tried to revive my original system, but the old finger powered pump was barely up to the task. In fact, I find it hard to believe it was ever up to the task. Something better was needed.
THE PUMP

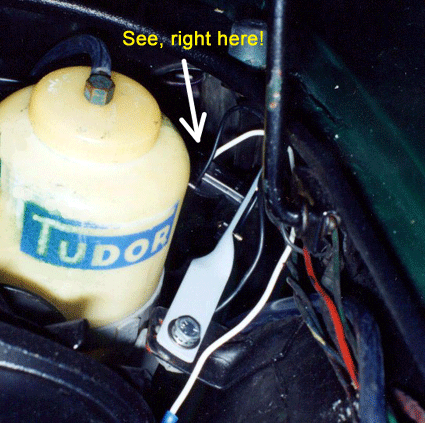
While it is possible to buy a direct replacement pump, I decided that it would be more fun to redesign. Rather than searching the stripper yards for something useable (not fun in January in New England), I found a new generic “in line” pump at my local Auto Zone for $10 (part number 9-300 from TAAP Corp.). I fabricated a little bracket to mount it next to the original reservoir bottle. The bracket is visible in the photo, but trust me, the pump is there, right below the arrow. The old check valve was removed from inside the bottle, and a new hose connected the bottle outlet to the pump.
THE SWITCH
An electric pump needs a switch. I didn't want to add a switch to the dash, and hiding a switch somewhere would be inconvenient. So the obvious, and fun, solution was to install the switch within the retired finger pump.
The old pump was easily disassembled by un-crimping the lip from around the plastic bottom. The metal is relatively soft, so it unfolds easily. The bottom and the old rubber bellows should come right out, leaving only the plunger within the shell of the pump. My plunger moved rather stiffly, so I took the opportunity to polish the shaft a bit.

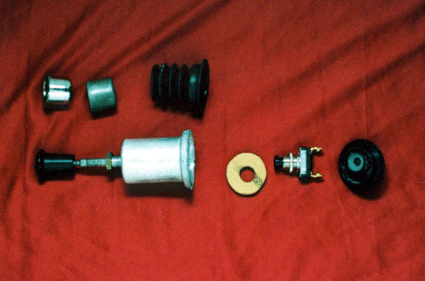
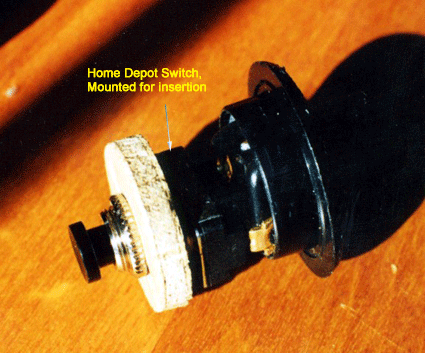
All of the parts, new and old, are visible in the “exploded view” photo. The switch came from Home Depot, a generic normally open push button, but I'm sure there are many others that could be adapted to the task. The photo of the switch and base assembly shows how the two terminals of this switch fit nicely into the plastic base. A hole was drilled in the base to provide an exit for the wires. The outer diameter of the thick washer (actually a plywood disk) that I added to the switch is a tight fit to the inside of the pump shell, helping to hold it in position.

Power comes from a switched terminal on the ignition switch, and is connected to the new wiring through an in line fuse holder. From the other side of the switch, a new wire carries power to the “plus” side of the pump. The “minus“ side of the pump is grounded at the mounting bracket.
HOSES
I replaced all of the hoses up to the “T” under the dash. For those of you who haven't tried threading a new washer hose through the fire wall holes, it's not as simple as it first appears. The hose goes through the inaccessible (without a torch) boxed in section of the fire wall next to the heater core, and the hole into the engine compartment does not align with the hole into the under dash area.
A piece of steel wire just under a yard long was used to connect the two hoses. I pushed the wire as far into the old hose as I could, which was nearly to the inner hole, then pushed the new hose over the remaining wire until it met the old. With my son pushing on the outside, and me pulling under the dash, the new hose followed the old right to the inner hole. The new hose I'm using has a larger outer diameter than the original, almost matching the diameter of the fire wall holes, so it took a minute or two of wiggling to get it through. The new hose has a larger diameter than the old, making a pretty good seal at the fire wall as is, so no grommet is necessary. I'm considering putting a section of heat shrink tubing on the hose right where it goes through the hole to make a better seal.
With the whole system assembled, the first push of the button was quite impressive. The windshield didn't get too wet, but the trunk lid did. The new pump provides more pressure and flow than the finger pump ever could, so I had to adjust the jets down a few degrees. I also decided to clean out the jets, and ran a 0.031” drill down both of them. I guessed at the size, and I did see a few flakes of what looked like metal come out, so I think I enlarged the holes a little. In any event, there's still plenty of velocity in the flow to hit the trunk lid if mis-aimed.
Sure, a Sunbeam concours expert might spot the pump, the odd washer hose routing, or the extra wires, but other than that, it's a fairly invisible improvement. The pump could be hidden better if that's your thing. Far more important to me is the ability to quickly clear the windshield for those sunset drives toward the west, etc. Add a load of bug remover washer fluid, and I'm ready for summer.
Stu Brennan
|
Anyone who would like to contribute to this effort should contact us at Editor E-Mail. Thank you. |
 **
**


