"The Tiger Ackerman Angle"
An Article by Larry Paulick
April, 2002
Page 5
Part 5 – Connecting the Rack and Pinion to the Steering Arm
1. There are 2 special adjusting nuts, supplied with the kit. They are attached to the end of the arms of the rack and pinion, and to the Alpine tie rod ends. Screw them on about half way on each part now.
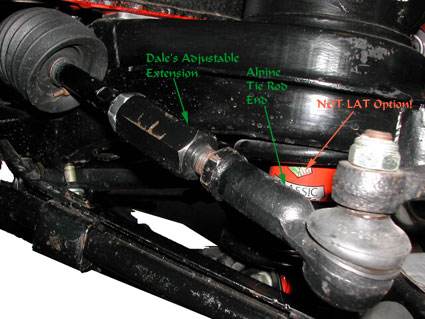
Adjusting Extension
2. The tie rods are mounted, with the nut on the top side. This is to fit the tie rods properly into the steering arms taper, which, as you remember, were reversed, left to right.
3. Positions the tie rod ends into the steering arm, and loosely attach the nuts.
4. You may find that the tie rods will not fit concentrically into the steering arms at this time. Don’t worry. The reason is that the springs are in full extension, and do not allow proper alignment. When the weight of the car is on the springs, they will align.
5. If you are using the brake rotor dust shields, you will have to cut the sheet metal shield to clear the a arm, tie rod connection/junction, as this junction, is now forward and farther outside of the car than the original junction. This is what makes the difference in Ackerman angle in this installation
Part 6 – Test the Rack and Pinion
1. Now is the time to test the rack and pinion, to see if it moves freely. You can use a pair of pliers, or vise grips to grip the rack and pinion spline and turn to make sure the spindles move freely. Don’t damage the spline when you grab it with your pliers, such as protected by wrapping with duct tape, or pliers with plastic covers on the grasp end.
2. If the steering moves freely, do the final torque of the adapters to the rack and pinion and to the cross member. Torque to 20 lb-ft.
Part 7 – Fit Cross Member to the Car & Other Details
1. Now is the time to refit the cross member to the car. There are several “tricks” to get the 4 bolt holding the cross member to the frame, to align. I use a long wooden dowel in the holes to align 3 of the 4 holes, then start the first bolt, then one on the other side, etc. You may have your own “tricks”. Refer to the Shop Manual.
2. After the 4 cross member to frame bolts are started, snug them a little at a time, so as not to bind the bolts, and finally torque the bolts to 62 lb-ft.
3. You now need to make sure the steering wheel is centered, and connect the steering shaft to the rack and pinion. Then adjust the toe in of the car.
This is also a good time to check the alignment of the car, as it may have changed with the addition of a new R&P and other various parts, or may have been off anyway. In any event, with your new R&P, you want to have the correct alignment.
You can have this done, or you can do it yourself. Make sure you are sitting in the car, so that the caster and camber can be set correctly. It will change significantly without the weight of the driver in the car. Refer to the article on Alignment on the Tiger United site "Performance Tuning Front End Alignment"
The steering effort at rest is increased, but after the car is under way, the effort of steering is very good, and because the turn to turn is less, 2:7 vs. 3:7 turn lock to lock, the response is very quick, but not twitchy.
I put the front tires on a turntable, to check the final ackerman angle. Dale’s kit puts the ackerman angle at a neutral angle, and not the wrong ackerman angle that the stock Tiger suffer from. A gain of 3 degrees, in the right direction.
Remember, that the suspension must be in good shape, aligned properly, or you will not benefit for the changes this kit provides.
I hope this helps you understand installation of this kit. After driving the car for a while, I would do it again. I think this is a worthwhile addition, to making the Tiger an even better and safer car.
Larry
 **
**