**


"3 Point Seat Belts"
or
"You Want Automatic, or the Stick Shift? (8-)"

An Joint Article by Larry Paulick & Steve Laifman
May, 2002


Page 2

3 Point Seat Belts, a Choice

Installation

The installation of this seat belt is very easy. The welded and reinforced mounting holes for the lap portion of the belt were installed when the car was built. And as some already know, the third mounting position was also installed when the car was built.

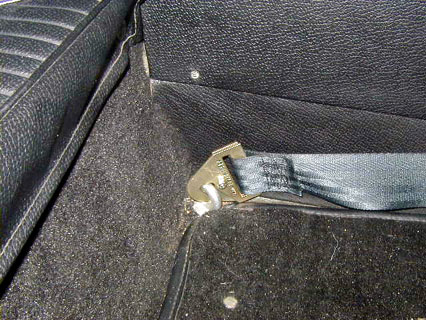
This third mounting bolt can be viewed from the inner rear fender well. On the inside it is covered by the interior vinyl, and the outside, the hole is plugged with a plastic plug.

Scoring the vinyl with an "X", after locating the plastic thread plug, allows for easy removal.

Larry:
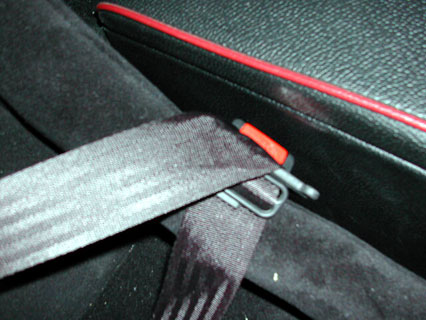
The inboard mounting point, with the red release button is mounted first.


Inboard Mounting Point (Larry)


Inboard Belt Connected (Larry)


Steve:
The provided "eye" bolts are hardened steel and screw into the factory mounts on the floor: The belt end is the "double-hook" type.


Inboard Mounting Point (Steve)


Inboard Belt Connected (Steve)

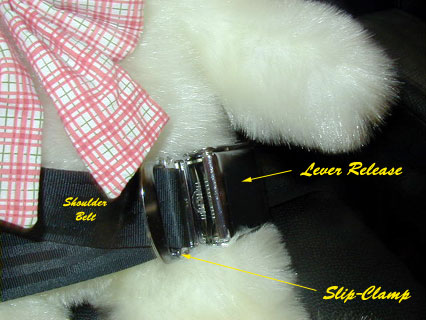
The belt snugness is normally adjusted by pulling on the end threaded through the lever release buckle slip-clamp. The lap/shoulder loop feed-thru slip-clamp allows the lap belt slip-clamp to be tight, and shoulder as slack as desired. These two can be used, in combination, to alter lap and shoulder lengths by altering length of lap belt, and hence length of shoulder strap. One counterbalances the other. Adjustment is normally made at the buckle end. The shoulder feed-thru is a cinch type, and allows the lap buckle centering to be as desired. However, the shoulder strap slack can be separately adjusted at it's own slip-clamp mount in area behind the seat. It can accommodate a wide range of girths without adjusting the shoulder belt length again, by merely allowing the belt center to be moved as i's length is changed, as is the shoulder slack. Beyond this, a re-balance of the two cinch points is required, but easy. Initially, some fiddling is required, but once done it is seldom that the rear belt adjustment need be changed.


  + The Roots of Rootes
  + History of the Tiger
  + Tiger Model Overview
  + Tiger Production
  + People & Pioneers
  + Workshop Manual
  + Factory Race Equipment
  + Literature: Books
  + Articles & Videos
  + Advertising

  + See Rootes Resources


  + History of the Tiger
  + Sunbeam Tiger 2005
  + Early Race History
  + Ken Miles, an appreciation
  + The "Beastie" explained
  + The Playboy Pink Tiger
  + Casting a Light on Lucas
  + LeMans at Goodwood 2002
  + Monterey Historics 2003
  + My Life With Cars

  + See Articles & Humor


  + High Perf. Exhaust
  + Tiger Dash Restoration
  + 350 Lunati Tiger
  + Installing a T5
  + Sound Advice
  + Installing New Carpet
  + The Ackerman Angle
  + "Cool It Buddy"
  + 3 Point Belts
  + Tiger Rotisserie Plans

  + Tiger E-Mail List Archives

  + See Technical Tips


  + Tiger Club Information
  + Events Calendar
  + Service Directory
  + Owner's Gallery
  + Buyer's Guides
  + Contributing Editors
  + Team Tiger Updates
  + Photo Gallery

  + See Online Resources

 
Anyone who would like to contribute to this effort should contact us at Editor E-Mail. Thank you.

Volunteers wishing to join our team are welcome. Take a look at our Contributing Editors
This site has been designed to pool the collective resources of the many great regional and national Sunbeam Tiger clubs. Membership to the these clubs is strongly recommended. Use our Clubs and Organizations Directory to find the organization nearest you and get involved.
**