Repairing Jaeger and Smiths Speedometers
An Article by Anthony Rhodes Copyright 2000
Page 10
Odometer: Dismantling
Note: Subsequent pages contain illustrations that may be handy for reference for this section.
It is usually only necessary to remove the pointer and face in order to access the odometer wheels. Further disassembly usually does not improve access to the odometer wheels, and exposes the pointer spindle and the coiled return spring to potential damage.
The worm-driven gears are held in place by a spring clip (see the exploded diagrams). Remove this clip and then the gear may be withdrawn from the frame. Clean the bushing in the frame and the gear. Lubricate it with light grease and reinstall it. The spring clip is difficult to install, but with patience it will snap in place. Damage to the odometer works is most likely to occur to this gear as it is the only plastic part in the pre-1968 (or so) units. In later units, the entire works is plastic and damage can occur anywhere. The odometer wheels turn on an axle. This axle is held in place by a spring clip on the left side of the wheels. In the older units this clip is a metal snap that has a finger which locks into a recess in the yoke holding the axle. The top edge is lifted away from the yoke to unlock the snap, then it is pulled upward to remove. Then the axle may be slid out to the left or right. Depending on your needs one direction may be more useful than the other. For instance, if you simply need to replace the gear to the left of the wheels, then pressing the axle to the right slightly will allow the gear to be removed without disturbing the odometer wheels themselves.
In newer units, the axle is retained by a split nylon washer. This washer is more difficult to unlock from the axle. You need to use a fine screwdriver to displace the leading edge of the washer out of its groove in the axle and then continue the displacement around the perimeter of the washer. Once it is out of the groove, the axle may be slid out through the washer. Again, depending on the direction you need to move the axle, you will need to displace the washer one way or the other on the axle.
When the axle is free, you will see that the gear is pressed against a washer by a spring. This washer has indentations which match similar ridges on the gear. This causes the gear to "ratchet" forward and inhibits motion of the gear without the pull of the pawl. When reinstalling the gear, washer, and spring, the spring tends to fly across the room if given the opportunity. Be very careful then compressing the spring and attempting to re-insert the axle through the spring. The wire of the spring will tend to snap into the groove for the locking snap/washer. A little fiddling with the axle and spring will allow the axle to move past the spring.
It is possible to change the odometer reading by rotating the wheels. The wheels have a locking mechanism that needs to be addressed in order to make the adjustment. Early speedometers have brass fingers under the wheels between the frame and the wheels which prevent forward movement, or backward movement past zero. You can rotate the wheels backward by simply turning the wheel, but you can not back up past zero. To rotate forward or backward at will, you need to press the brass finger underneath the wheel to disengage the lock and then spin the wheel
Newer odometers have cogs between the wheels. It is necessary to completely remove the wheels from the axle, then turn each wheel individually to the proper orientation, then re-stack the wheels and remount them on the axle.
The trip odometers are essentially the same except that only the gear on the end (in this case the gear is to the right of the 1/10ths wheel) will ever need to be changed unless there is a damaged wheel. Newer odometers do not have a drive gear for the trip odometer. Instead there in are gears in the works between the two odometer mechanisms to drive the trip 1/10ths wheel off the unlabeled 1/10ths wheel of the main odometer.
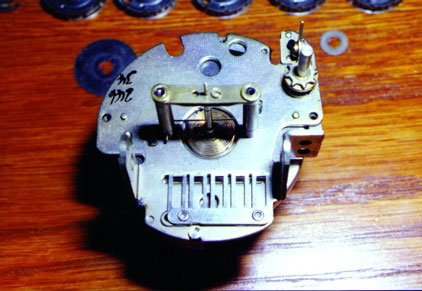 |
Figure 9: The main frame on the "Early" speedometer with the main odometer disassembled and the trip odometer frame removed. The "hair spring" is visible. On the other side of the frame is the drag cup. This frame is from an MGA and has the trip reset wheel entering straight into the frame. The metal fingers which allow indexing of the odometer wheels are visible on the lower section of the frame. |
 **
**