Cool It, Buddy!
An Article by Steve Laifman
Sept. 2001
Page 2
The Water Pump & Other Goodies
- The original stock water pump seems to be in good shape.
Eventually I might change to Edelbrock high flow Mustang 289 HiPo engine
model, when I must.
- I installed the Gant brass filter screen in the brass
housing that has hose retainer ridges. . Might look at soldering/brazing
outer ring with screws from previous plastic unit to radiator inlet to
allow cleaning with one simple joint disconnection. This is of maximum value
for old blocks and new small diameter tube cores. Rodding these just jams up
the tubes with the scale it is pushing out, and breaks them. I also used
some extra hose clamp stainless bands under the bands holding the hoses on
to the Gant. The ends beyond the clamps were cut off with about 1 and 1/4
band width left on each side. These were bent over the clamps to keep them
from releasing the Gant, and the water. It's a slip fit, so removal is no
problem, and a lot easier and sturdier than safety wire.
 Self designed aluminum horn hole air blockers, with slot for horn, extended horn base, grommeted hole for wires, and double sticky tape mount of plates. Simply remove horn and trace the radiator header hole pattern on cardboard on other side. Self designed aluminum horn hole air blockers, with slot for horn, extended horn base, grommeted hole for wires, and double sticky tape mount of plates. Simply remove horn and trace the radiator header hole pattern on cardboard on other side.
 Make an aluminum sheet plate about 1/4 in. larger all around and dry fit on
front side of radiator support. The edge closest to the side wall is the
tightest fit. Remove the horn bottom bolt and use the tongue plate to make a
steel or aluminum piece exactly the same, but 2 in. longer. Drill hole in
block-off plate for rubber grommet that will let the horn wires through. Put
the wires through the plate and the loose grommet, then insert in blocker.
There needs to be a slot in the plate exactly at the horn extender frame mount
level, but wider than the support bracket, as it goes through at an angle.
Paint both plate and tonque to suit taste before assembly.
(Design on last page).
Make an aluminum sheet plate about 1/4 in. larger all around and dry fit on
front side of radiator support. The edge closest to the side wall is the
tightest fit. Remove the horn bottom bolt and use the tongue plate to make a
steel or aluminum piece exactly the same, but 2 in. longer. Drill hole in
block-off plate for rubber grommet that will let the horn wires through. Put
the wires through the plate and the loose grommet, then insert in blocker.
There needs to be a slot in the plate exactly at the horn extender frame mount
level, but wider than the support bracket, as it goes through at an angle.
Paint both plate and tonque to suit taste before assembly.
(Design on last page).
- Mount all to the plate and add double-sticky foam insulation tape (Home
Depot again). Slide the tonque on the mount surface and peel off the back
sticky paper cover so that the tongue is on the frame mount as the tape
bonds the assembly to the radiator header. Bolting loosely and then tighten.
Is this a killer loss of air by-passing the radiator. Probably not, but it
is a path that should never have been allowed, and is larger than most of
the "Le Mans" style air outlets put on, although not as pretty as
it cannot be observed without a lot of looking.
- I added a LAT hood later, because - well just because I like it, as it
ran cool before adding.
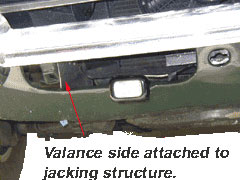 Added Laifman Kustom Design air duct between under lower valance
inlet vents and over cross member and radiator bottom, with mounting to side
frame horns. Keeps all collected inlet air going through the radiator, and
prevents by-pass, or even recirculation of hot engine compartment air into
radiator inlet. Invisible, and no hanging "racy air dams" to catch
every road speed bump and parking lot wheel stop. The right inlet duct is
shown here, and the bottom of the radiator can be seen. This duct effectively
is aimed to pass the inlet air under the radiator! The jacking hole, on the
frame horns is visible, as well as the side piece of the air duct, and a
portion of the electric fan angle bracket. The pattern I used is dimensioned
in this article (Design on last page).
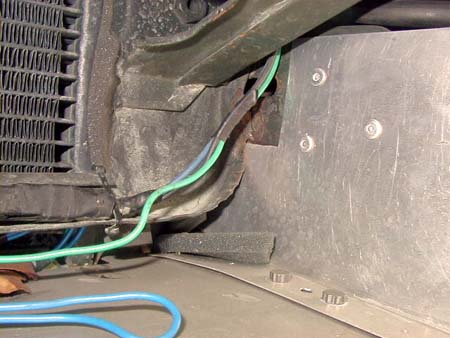
Added Laifman Kustom Design air duct between under lower valance
inlet vents and over cross member and radiator bottom, with mounting to side
frame horns. Keeps all collected inlet air going through the radiator, and
prevents by-pass, or even recirculation of hot engine compartment air into
radiator inlet. Invisible, and no hanging "racy air dams" to catch
every road speed bump and parking lot wheel stop. The right inlet duct is
shown here, and the bottom of the radiator can be seen. This duct effectively
is aimed to pass the inlet air under the radiator! The jacking hole, on the
frame horns is visible, as well as the side piece of the air duct, and a
portion of the electric fan angle bracket. The pattern I used is dimensioned
in this article (Design on last page).
 The vertical partial cut on the side is to allow some hand bending to cover the area between the vertical frame horns and the ends of the radiator (next picture shows this bending of the vertical cut curved to the side of the radiator, if you look closely. Belts and suspenders. The shaped front fits under the lips of the valence vent, but the final path is just sort of actually touching. More Home Depot double-sticky thick foam insulation is used to form the seal and prevent contact. Some self-adjustment with aircraft snips will be required as no two valences are the same, or even each side may be different. This is a "sneak" air dam that cannot be observed, will not hit the speed bumps or parking curbs, does not look like a rice-burner special, but absolutely prevents recirculation of hot air from the engine compartment and makes ALL the air entering the front go through the radiator.
 The side plates are held on to the frame horns with pop rivets. The bottom plate is attached to the angle bends of the side plates after dry fitting the bottom plate and marking. Rivnuts were installed in the bottom panel, and bolts through the side plate bent angle. Titanium machine screws with 8 point heads make the whole thing good for 200 mph. Well. they look good. Paint to suit taste. The side plates are held on to the frame horns with pop rivets. The bottom plate is attached to the angle bends of the side plates after dry fitting the bottom plate and marking. Rivnuts were installed in the bottom panel, and bolts through the side plate bent angle. Titanium machine screws with 8 point heads make the whole thing good for 200 mph. Well. they look good. Paint to suit taste.
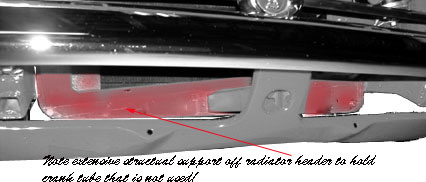
Compare to trimmed header, with folded "U" bottom rigid section, to allow more
radiator exposure to air flow, while still supplying support for crank tube and electric
fan support. See pictures above and below.
Note high density radiator tubes and fins. Side plate pop-rivited to frame horn. Bottom panel fits under radiator and is attached to rivnuts in the plate with aircraft titanium bolts - to save weight!
Note high density radiator tubes and fins. Side plate pop-rivited to frame horn. Bottom panel fits under radiator and is attached to rivnuts in the plate with aircraft titanium bolts - to save weight!
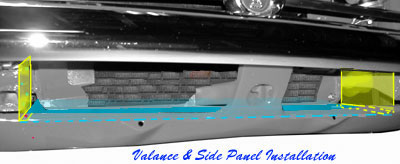
Layout of Valance Side Panels and Bottom
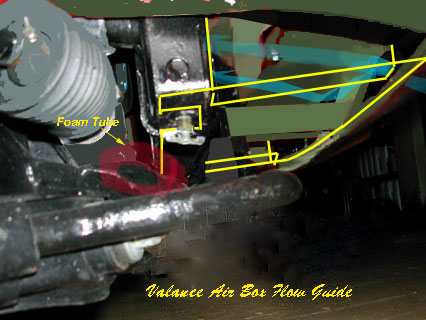
Stuff air conditioning Foam Insulating Tube between bottom of Valance Air Box
and cross member all the way across. Makes X member an Air Dam!
 I used a coolant recovery system. The overflow mini 1 1/2 Qt. coolant return-recovery system mounted between surge tank and radiator on left fender. Interdynamics MCR-3, about $5 at Pep Boys. Need recovery type 13 psi cap. I used a Stant "Lever Action" safety pressure release. Most surge tanks do NOT have an overflow tube that is air/vacuum tight at the metal filler neck, no matter how well you do the hose clamping. Never intended to suck, don'tcha know. Probably needs brazing to tank neck, and perhaps a bead on the end to hold the hose on better. If you ever find those bolts for a tank strap, with the proper threads and a straight, unthreaded tip, let me know. It would be great for lining all that stuff up to R&R the straps. Really a pain, otherwise. I used a coolant recovery system. The overflow mini 1 1/2 Qt. coolant return-recovery system mounted between surge tank and radiator on left fender. Interdynamics MCR-3, about $5 at Pep Boys. Need recovery type 13 psi cap. I used a Stant "Lever Action" safety pressure release. Most surge tanks do NOT have an overflow tube that is air/vacuum tight at the metal filler neck, no matter how well you do the hose clamping. Never intended to suck, don'tcha know. Probably needs brazing to tank neck, and perhaps a bead on the end to hold the hose on better. If you ever find those bolts for a tank strap, with the proper threads and a straight, unthreaded tip, let me know. It would be great for lining all that stuff up to R&R the straps. Really a pain, otherwise.
- I did add a Stainless Steel Stant thermostat with a carefully drilled 1/8 inch hole in the plate. Why, you may ask, did I do this, and what function does it perform? I will tell you. I don't know! But, it's what all the racers do, and they win - so "It couldn't hoit". Since I live in California, and do not worry that the heater will not get hot enough in the winter to warm my footsies - the engine does a good job anyway, I used the 160 degree model recommended for English summers. The car will run at 190-200 Deg. F., anyway. Yes the temperature measurement system has been calibrated at those temperatures.
I cannot tell you which portions of this overall design approach contribute what, but most are easy to do, and the radiator and electric fan are mandatory in this environment, and represent the greatest cost. The brass Gant is going to save your replacing a radiator soon, so is cost-effective if you remember to clean it, and I do believe the air containment/guidance system is very effective in keeping friends, as well easy to make and install, and inexpensive. I do believe the sneak air ram tunnel is really good, and very cheap.
So how good is it? Well, I went from doing foul things to friends driveways to running cool climbing 10,000 feet in 100 Deg weather, and bumper to bumper coming home.
Many friends have used portions of this design (6 blade fan, electric fan, and radiator) and agree.
|
Anyone who would like to contribute to this effort should contact us at Editor E-Mail. Thank you. |
 **
**