"The Tiger Ackerman Angle"
An Article by Larry Paulick
April, 2002
Page 3
What You Provide:
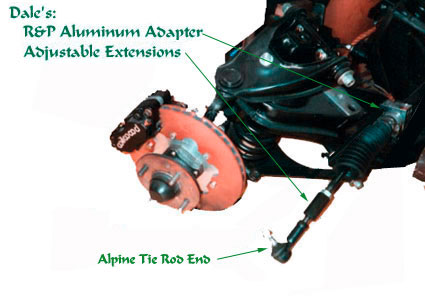
1. R&P from a 1961-72 MG Midget. This R&P is identified by a “ring/collar” on the ends of the tube that holds the R&P mechanics. This is what Dale’s adapter grabs onto.
This R&P has provision for grease fitting, and I elected to pack the R&P with Mobil 1 synthetic grease, and install new rubber boots. The R&P moves very smoothly with this addition, and if needed, I can use a grease gun to add more lubricant.
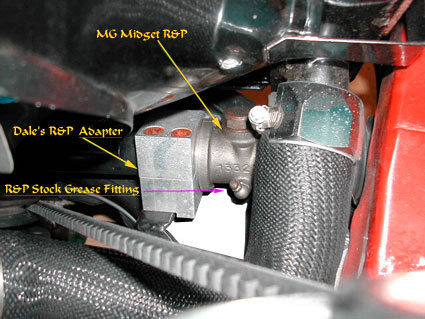
R&P Grease Fitting
2. MGB steering arms. There are left and right arms, and depending on what model you get, there may or may not be an identification on the arm itself for the left and right. I have seen both. They will not be identical, and should be a pair, of left and right, or mirror image, and certainly not the same in looks, i.e. 2 lefts. Pay attention to the taper in the end that accepts the tie rod ends. This will come up later.
Make sure they are in good shape, not bent or damaged. These are cast pieces, receive a lot of stress in the suspension, and need to be in excellent shape. You can buy them new, expensive, or get them from a used source.
3. Left and right Alpine 4 or 5 tie rod ends. Get new ones, as they are cheap.
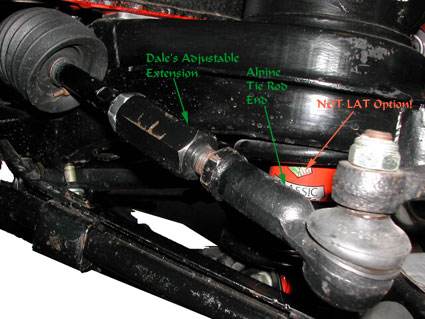
MGB Steering Arm & Alpine Tie Rod End
Note: - Remember, used front suspension parts, may have been in a front end wreck, and could be damaged, so know your source, or have them checked out by a pro, as this is too important to make a mistake.
Special Note – The bolts holding the steering arm to the spindle should be changed. I like to use grade 8 bolts for suspension parts, as an added safety factor. Don’t use the old 35 years old bolts. The same goes for the bolts holding the cross member to the frame. Chase all treads with a tap, to insure clean treads, so that you get accurate torque readings. You will also want to use lock tight on the treads, and torque to spec.
Installing the Kit
Part 1- Removal
1. First remove the front cross member from the car. Refer to the shop manual for this procedure.
2. Remove the tie rod ends from the steering arms, and save, if you want to return to stock later.
3. Remove the stock rack and pinion from the cross member, and save, if you want to return to stock later.
Note – The stock Tiger rack and pinion is a rare piece, so you may want to hold onto it, or sell it, depending on what your preference.
4. Remove the stock steering arms, and save, if you want to return to stock later.
Part 2 – Inspection
1. This is the time to thourglhy clean the front suspension and cross member, so that you can inspect the various parts, and paint the cross member, spindle, etc.
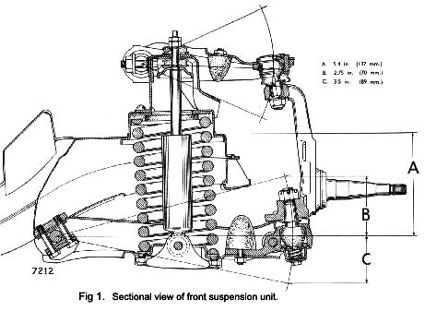
Rootes Factory Workshop Manual
Front Suspension - Section F
2. You should inspect the rack and pinion mounting brackets, to see if the factory welds are cracked, and if so, reweld them at this time.
3. You should inspect the upper and lower a arm, ball joints, and fulcrum pins, and rebuild, replace those parts if worn, or damaged. The shop manual, will describe how to do this work.
4. There is an excellent article from STOA, and in the CAT Notes on reinforcing the front cross member in those areas that are weak, or need reinforcing. This is the perfect time to do this. You should check the cross member to see if it is bent or collapsed. The article covers this as well.
5. Look at you brakes, and brake flex lines. Do they need rebuilding, or replacing, as now is the perfect time.
6. When was the last time you repacked the front wheel bearings? Never? Well, now is the time to do this.
Special Note – The front suspension on your car is 35 years old, and unless you are the original owner, you don’t know what has happened to the car before. Spend the extra time, and if necessary, the money, and make sure you inspect and repair those items noted above, or anything else that is wrong. Refer to the Shop Manual.
You will not benefit from the advantages of a new Ackerman Angle kit, or have a safe car, unless you bring your basic suspension back to the proper and safe condition.
 **
**