|
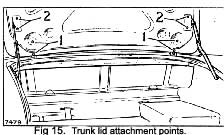
TRUNK LID (Fig. 15)
To remove
Support the boot lid with a suitable sling in the open position.
Remove the nuts, screws and washers from each hinge (1), and the setscrews with their washers (2) from each support prop.
Reverse these Instructions when refitting.
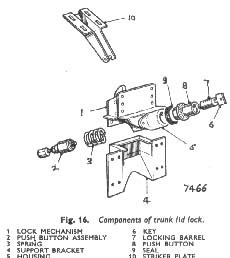
TRUNK LID LOCK (Fig. 16)
To remove
From below the outer edge of the boot weatherstrip remove the two self-tapping screws.
Remove the two screws from the rear of the top face of the lock, and remove lock from inside the boot. The striker plate is removed by taking out the four securing screws with their washers.
The mounting holes in the plate are elongated to provide a means of adjustment.
To refit
Reverse the above procedure.
FRONT AND REAR BUMPERS
To remove
The bumpers can either be removed complete with their mounting brackets, or without.
|
In the first case, remove two bolts (one each side) with their washers for both the front and rear bumpers.
In the tatter case, remove the nuts and washers from the outer sides, and the bolts and washers (which also retain the overriders) from the inner mountings on both the front and rear bumpers.
AIR INTAKE APERTURE FITTINGS
To remove (Fig. 8)
The centre badge (7) is retained to the badge surround (5) by cranked push-on clips.
The badge surround (5) is retained to its bracket (6) by nuts and washers. These nuts and washers also retain the Inner ends of the R/H (3) and L/H (4) centre mouldings.
One screw at the upper, and one bolt at the tower attachment points retain the centre badge bracket (6) to the body.
The outer ends of the centre mouldings (3) and (4) are retained by two of the stud plates and nuts which retain the upper moulding (2) to the body.
The lower moulding (8) Is retained by four concealed clips which are a push-fit into the front apron.
NAME BADGES
To remove
Friction bushes and washers are used in the retention of the name "Sunbeam" on both the bonnet surround and the trunk lid. The "Alpine" and "260" model designa-tion plaques on the rear end of the front wings are retained by push-on clips on to the pegs on the reverse side of the plaques.
If it is desired to remove any of the badges, simply pull off their respective retainers.
When refitting, new retainers should be used.
|
 **
**