BACKLIGHT
As with the windscreen assembly, the services of two operators are required to carry out the removal and refitting of the backlight, one working on the inside and one on the outside of the car. The backlight is located by means of the rubber weatherstrip around its periphery only. No other form of fixing is used but the contacting surfaces are treated with "Seelastik" sealing compound during assembly. The backlight is removed by pushing it outwards from the interior of the car, in order to do this it will be necessary to break the seal of "Seelastick" compound between the backlight aperture and the rubber weatherstrip.
To remove (Fig. I0)
Before the backlight can be removed, the mouldings will first have to be released.
Prise out the upper and lower Joint covers (14), then, working from either the upper or lower centres, remove both the R/H (15) and L/H (16) mouldings.
To release the lip of the weatherstrip from the hardtop aperture, the "Seelastik" seal formed during original assembly must be broken.
This is done by the use of a tool in a similar manner to the instructions given under "Windscreen".
Apply hand pressure to the backlight from inside the car, and force outwards complete with weatherstrip. The second operator (outside the car) can then support the backlight as it is released.
To refit
Remove all traces of old sealing compound from the backlight and weatherstrip before fitting the weatherstrip.
Apply a coating of "Seelastik" to the face of the weather-strip which is in contact with the outside face of the backlight.
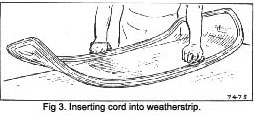
Cut a piece of strong cord of length considerably greater than the periphery of the backlight. The use of thin string should be avoided as this will cut the rubber.
Insert the cord into the Inner channel of the weatherstrip (rig. 6) so that the loose ends are near to the centre of the lower edge.
|
Ensure that the hardtop aperture is clean and free from grease.
Apply a coating of ‘Seelastik" to the outer channel of the weatherstrip which will be in contact with the flange of the aperture in the body.
Allow the two ends of the cord to hang on the inner side of the backlight.
Press the assembly into the aperture from outside the car, pressing the corners well home before starting to work the Inner lip of the weatherstrip over the hardtop flange by pulling on the ends of the cord.
Pull out this cord completely.
If the outer lip of the weatherstrip becomes folded under itself, work it free with a small screwdriver.
INTERIOR DOOR HANDLES
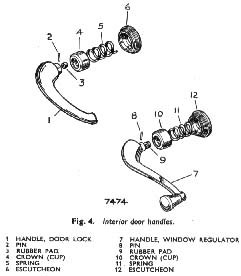
To remove (Fig. 4)
Window regulator
Push the cup (10) towards the trim pad, turning while still pushed in until the end of the handle (7) retaining pin (8) Is exposed. Tap out the pin, and take off the handle, cup and spring (11), followed by the escutcheon (12).
Door lack remote control
The door lock remote control interior handle (1) is removed in exactly the same way as the window regulator handle.
To refit
The refitting procedure for both handles is a reversal of the window regulator handle removal procedure.
|
 **
**