WINDSCREEN
The services of two operators are required to carry out the removal and refitting of the windscreen, one working from inside the car and one from the outside. The wind-screen is retained in position by means of a rubber weatherstrip around its periphery. No other form of fixing is used, but the contacting surfaces are treated with "Seelastik" sealing compound during assembly.
"Seelastik" is obtainable from Expandite Products Ltd., Cunard Road Works, London, N.W.1O, England.
To remove (Fig. 2)
If a hardtop is fitted, this must be removed.
Remove the upper (6), lower (7), and side (8 and 9) mouldings.
Remove the weatherstrip (4),and drip mouldIng (5) from their locations on each "A" post.
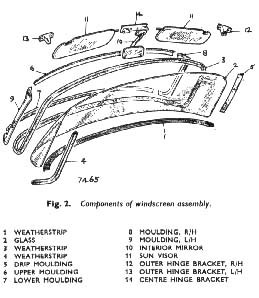
Remove wiper arms, Interior rear view driving mirror, and the sun visors. The "Seelastik" seal formed during the original assembly of the weatherstrip into the body must be broken. The use of a small screwdriver from which all sharp edges have been removed, or suitable wedge-shaped pieces of hardwood are recommended. Care should be taken when using either method to keep the tip of the implement under the lip of the weatherstrip, otherwise damage to paintwork may well result.
|
Apply hand pressure to one of the lower corners and force the windscreen outwards. The second operator (out-side the car) can then support the windscreen as it is released.
To refit
Remove all traces of old sealing compound from the windscreen and weatherstrip. Assemble the weatherstrip to the windscreen, starting at one of the lower corners, ensuring that the weatherstrip is square at the corners and flush to the windscreen throughout its entire length.
Apply a ribbon of ‘Seeiastik" to the outer faces of the
weatherstrip which are in contact with the windscreen.
For this operation a special gun is available from Expandite Ltd., who also supply full instructions for using the gun.
In the absence of such a gun, an adaptor in the form of a piece of piping with a flattened end could be fitted to a lubrication gun which has a screw type plunger.
The windscreen must be completely clean before applying "Seelastik", otherwise an effective seal will not be obtained.
Cut a piece of strong cord of length considerably longer than the periphery of the light. Thin string will cut the rubber.
Insert the cord into the inner channel of the weatherstrip (Fig. 3), so that the loose ends are near to the centre upper edge.
Ensure that the flange of the aperture in the body is clean and free from grease.
Apply a coating of " Seelastik "to the outer channel of the weatherstrip which will be in contact with the flange of the aperture in the body.
Press the assembly into the car from the outside with the two ends of the cord on the Inner side of the windscreen. Starting at the bottom, work the lip of the weatherstrip over the aperture flange by pulling the ends of the cord.
Pull out this cord completely. Some pressure must be exerted on the windscreen during this operation, par-ticularly at the corners.
Excessive pressure should not be used when fitting laminated screens.
Remove excess sealing compound with a rag slightly dampened with petrol or white spirit.
Refit sun visors, rear view Interior driving mirror and the wiper arms.
|
 **
**