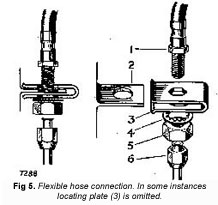
| 1 HOSE HEXAGON |
4 WASHER |
| 2 SUPPORT BRACKET |
5 NUT |
| 3 LOCATING PLATE |
6 PRESSURE PIPEUNION NUT |
To remove and refit (Fig. 5)
1. Grip the hexagon of the flexible hose adjacent to the Support bracket with a Spanner: when a locating plate is fitted to the Support bracket this spanner is unnecessary. Detach the pressure pipe from the flexible hose by releasing the union nut and trapping any escaping fluid in a drip tray.
2. Still holding the hexagon of the flexible hose, withdraw the flexible hose from the support bracket by releasing the locknut and washer; when a locating plate is fitted, it is unnecessary to hold the flexible hose.
3. Remove the flexible hose from the front caliper by applying a spanner to the hexagon at that end and permitting its entire length to rotate.
4. Refitting Is the reverse of the removal sequence but particular attention must be given to the following: —
(I) It is essential that the flexible hose is fitted to the front caliper using a new gasket.
(ii) Feed the end of the flexible hose Into the support bracket, apply a spanner to the hexagon and set the run of the hose to clear all obstructions that could cause chafing. Secure the flexible hose to the support bracket with the washer and nut and fit the pressure pipe to the protruding threaded end of the flexible hose with the union nut while holding the hexagon with the spanner to prevent the flexible hose from rotating.
|
When fitted, slide the locating plate onto the support bracket so the plain hole is on the pressure pipe side. Feed the end of the flexible hose into the locating plate and support bracket, locating the hexagon within the plate so the run of the flexible hose is clear of all obstructions that could cause chafing. Secure the hose and fit the pressure pipe as described in the previous paragraph.
(iii) Check that no chafing can occur under conditions of full bump and rebound by bouncing the body of the car up and down. In the Instance, of the front flexible hoses, position the front wheels on both full locks in addition to the straight ahead position.
(iv) Bleed the hydraulic system of air, see under "Bleeding the hydraulic system."
MASTER CYLINDER RESERVOIR
Description
The master cylinder reservoir is fabricated from a trans-lucent material and provides instant recognition of the fluid level without removing the filler cap.
The reservoir is screwed directly into the feed port in the end of the master cylinder. It is Important to ensure that the filler cap seal is in good condition to prevent fluid leakage and the air vent holes are unobstructed for when these holes become obstructed pressure can build up In the hydraulic system and cause the brakes to bind.
To remove and refit
1. Unscrew the reservoir from the feed port in the front end of the master cylinder trapping the escaping fluid in a drip tray.
2. Refitting is the reverse of the removal sequence but particular attention must be given to the following:-
(I) The hydraulic system is bled of air, see under "Bleeding the hydraulic system."
|
 **
**