DESCRIPTION
The pedal assembly is of the pendulum type mounted in an individual bracket attached to the bulkhead inside the car. The master cylinder, push rod can be attached to one or the other of the two holes in the pedal lever and this will effect the’ position of the pedal pad by approxi-mately 1 1/2 in. (4 cm). The pedal return spring is mounted on the master cylinder push rod between the pedal lever and the bulkhead while the pedal stop is incorporated in the master cylinder.
To remove and refit
1. Identify the position of the clevis pin in the pedal lever and detach the master cylinder push rod from the pedal lever by withdrawing the spring clip from the clevis pin, removing the washer and clevis pin from the forkend.
2. Remove the pedal assembly from inside the car by removing the bolt and washer from the top of the bulkhead inside the engine compartment above the top master cylinder attachment and the top master cylinder nut, washer and bolt.
3. Refitting is the reverse of the removal sequence but particular attention must be given to the following: -
|
(i) The pedal lever has two push rod clevis pin holes and the push rod must be returned to its original position.
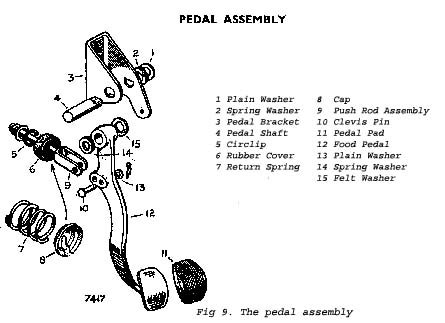
To dismantle and reassemble (Fig. 9)
1. Withdraw the felt and spring washers from inside the pedal bracket by discarding the split pin and ejecting the pedal shaft and collecting the plain and spring washers from the ‘D shaped end of the shaft.
2. Remove the rubber pad from the pedal when it is seen to be well worn.
3. Reassembly is the reverse of the dismantling sequence but particular attention must’ be given to the following: -
(i) The rubber pad is affixed to the pedal lever with a suitable adhesive.
(ii) The spring and felt washers are positioned one each side of the pedal lever within the bracket.
(iii) The pedal shaft is fed into the bracket and pedal lever "D" shaped end first, so the flat on the shaft aligns with the flat in the opposite end of the bracket, to Its fullest extent, the spring and plain washers fitted to the "D" shaped end, use a new split pin.
|
 **
**