DESCRIPTION
The handbrake operates on the rear wheels only and consists of a hand lever, situated between the driver’s seat and the door, with a cable and rod linkage connecting the hand lever to the two levers, one included in each wheel cylinder. The handbrake is automatically adjusted as the rear brakes are adjusted and when handbrake operation is correct there is four to six clicks of hand lever travel before the rear wheels become locked.
The handbrake cable is nylon lined and requires no periodical lubrication.
The rear end of the handbrake inner cable terminates at the lever of one wheel cylinder while the rear end of the
outer casting terminates in a clip welded on a brake rod connected to the opposite wheel cylinder lever with the inner end of the rod steadied by a bracket welded to the differential cover of the rear axle.
The wheel cylinder lever attached to the inner cable moves as the handbrake is applied and the opposite wheel cylinder lever, attached to the brake rod, moves due to the reaction of the handbrake cable outer casing. The inner ends of the wheel cylinder levers locate in apertures formed in the webs of the leading brake shoes, thus movement of these levers causes the leading brake shoes to move outwards to the brake drum. Further movement of the wheel cylinder levers causes the wheel cylinder bodies to slide in the back plate slot and move the trailing brake shoes outwards to the brake drums.
HANDBRAKE LEVER
To remove and refit (Fig. 7)
1. Chock the front wheels and release the handbrake.
2. Tilt the driver’s seat forward and remove the hand- brake lever shield from the door sill by withdrawing three screws.
3. Remove the handbrake lever from the door sill by withdrawing two bolts, washers and distance pieces; detach the cable from the bottom of the lever by withdrawing the spring clip from the clevis pin, removing the washer and clevis pin from the forkend.
4. Refitting is the reverse of the removal sequence but particular attention must be given to the following;
The distance pieces are fitted between the handbrake lever and door sill.
|
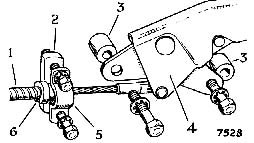
| FIG. 7 The handbrake lever ; left hand drive shown, right hand drive symmetrically opposite. |
| 1. HANDBRAKE CABLE |
4 HANDBRAKE LEVER |
| 2 DISTANCE PIECE |
5 ABUTMENT CLIP |
| 3 DISTANCE PIECE |
6 ABUTMENT BUSH |
HANDBRAKE CABLE
To remove and refit (Figs. 7 and 8)
1. Remove the handbrake lever from the door sill and cable, see under "Handbrake cable — To remove and refit".
2. Detach the handbrake cable from the door sill by withdrawing two bolts and washers from the abutment clip and distance piece, remove the abutment bush from the outer casing.
3. Withdraw the handbrake cable and floor grommet from beneath the car after removing the clip from the car frame by withdrawing a self tapping screw.
4. Detach the handbrake cable from the wheel cylinder lever by withdrawing the spring clip from the clevis pin, removing the plain and spring washers and clevis pin from the fork end.
|
 **
**