|
Turn the pinion by hand and check for run out of the drive gear, which should not exceed 005 in. (.127 mm.) If there is excessive run out, remove the differential -assembly from the housing and check for dirt or burrs
on the bearing surfaces. If possible mount the assembly between centres and check the gear separately.
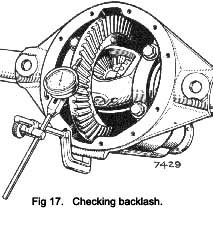
When satisfactory, remount the dial indicator on the carrier housing with the button against one of the drive teeth, and as nearly in line with the direction of travel as possible (See Fig. 17). Move the drive gear by hand and check that the backlash is as etched on the pinion head. If necessary rectify excessive backlash by trans-ferring shims to the drive gear side from the opposite side of the case.
To increase backlash transfer shims from the drive gear side to the opposite side of the case.
After setting the backlash to the required figure, mark the drive teeth with a suitable medium, using a brush, and rotate the gears backwards and forwards several times. The resulting impression should be as ‘&Mac183;A” in Fig. 18. Refer to the section on tooth contact and Fig. 18 for correction of tooth contact, if the first impression is not satisfactory.
FINAL ASSEMBLY
To complete the rebuilding of the unit
Remove the drive pinion nut, washer and coupling flange. Install the oil thrower and then fit the pinion oil seal assembly, dust excluder flange uppermost, not omitting the oil seal gasket. Fit by tapping evenly and gently all round the outer edge.
Fit the coupling flange, washer and pinion nut, and torque to the figure given in the General Data Section.
|
Fit a new rear cover gasket and rear cover, secure with the set bolts and lock washers. Fit the ratio tag to one of the bolts. Tighten evenly and diagonally all round.
Re-install the axle shafts and hub bearings etc., as des-cribed on Page 4 under “Axle Shafts to Refit.”
Grease the hub bearings with the correct grade of lubricant as described in “Axle Shafts to Refit” Page.4. Check that the drain plug is securely tightened, then fill with the correct grade and quantity of lubricant as recommended under General Data.
Replace the filler plug and check that the cover bolts are tight.
Carry out a test run and check carefully for oh leaks.
TOOTH CONTACT (Refer to Fig. 18)
This indicates the tooth bearing marking as seen on the drive gear.
The Heel is the larger or outer end of the tooth.
The Toe is the smaller or inner end of the tooth.
The Face top or addendum is the upper portion of the tooth profile.
The Flank or dedendum is the lower portion of the —tooth profile.
The Drive side of the drive gear tooth is Convex. The Coast side of the drive gear tooth is Concave.
(a) Ideal Contact
Fig. A shows the ideal tooth bearing Impression on the drive and coast sides of the gear teeth. The area of contact is evenly distributed over the working depth of the tooth profile and is located nearer to the toe (small end) than the heel (large end)... This type of contact permits the tooth bearing to spread towards the heel under operating conditions, when allowance must be made for deflection.
(b) High Tooth Contact
In Fig. B it will be observed that the tooth contact is heavy on the drive gear face, or addendum, that is, high tooth contact. To rectify this condition, move the pinion deeper into mesh, that is, reduce the pinion cone setting distance, by adding shims be-tween the pinion inner bearing cup, and the housing, and adding the same thickness of preload shims between the pinion shank and the outer bearing cone. This correction has a tendency to move the tooth bearing towards the toe on drive and the heel on coast. It may therefore, be necessary after making this change to adjust the drive gear as described in paragraphs (d) and (e).
|
 **
**