|
9. It should be possible to remove the differential unit with about .007 in. (.178 mm.) of spread, but do not exceed a maximum of .008 (.20 mm.). Take note of the amount of spread required.
10. Check the differential for removal by attempting to prise it out with two levers, one on each side of the differential gear case opening.
Use suitable packing between the gear case and the levers.
It must be noted that a certain amount of pressure is necessary to remove the unit from the casing, even when the spread is sufficient.
DO NOT use excessive force.
11. Remove the clock gauge before removing the unit.
METHOD 2.
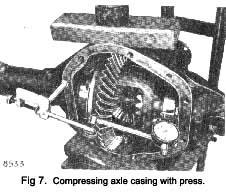
Using the Churchill press only (See Fig. 7).
- Withdraw the four bolts securing the two different-ial bearing caps, and remove the two caps.
- Place the axle on the bed of the press, supported on a block of wood.
- Place another block of wood between the press ram and the gear carrier housing.
- Operate the press until the axle is just held firmly in position.
- Fit up a clock gauge, as shown in Fig. 7, using a suitable stud, which should be a minimum of 4 in. (101 mm.) In length, when screwed into one of the bolt holes in the housing.
- Set the clock gauge with a pre-load on to the inside of the gear carrier housing, adjacent to the axle shaft tube, and set the clock gauge to zero.
|
7. Operate the press, and the action of compressing the casing will cause the gear carrier housing to spread at the bearing carriers.
The clock gauge will register the amount of spread.
8. Proceed as for Item 9, Method 1, onwards.
METHOD 3.
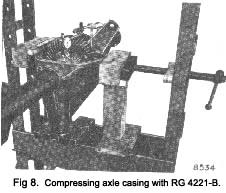
Using the Churchill press and Tool No. RG 4221-B. (Fig. 8).
- Withdraw the four bolts securing the two differential bearing caps and remove the two caps.
- Place the axle on the bed of the press, supporting the pinion drive flange on two steel blocks, with a suitable wood block between the carrier housing and the side of the press (Fig. 8).
- On the opposite side, make up suitable wood blocks as shown In Fig. 8, to bring the top block in line with the edge of the gear carrier housing. On this block place the cross-piece of Tool No. RG 4221-B.
- Pass the handle of the tool through the side members of the press, with the moveable cross-piece of the tool against the press side members (Fig. 8).
- Locate the end of the tool into the cross-piece on the axle carrier housing.
- Screw up the handle of Tool No. RG 4221-B until the axle is lust held firmly in position.
- Proceed as for Method 2, Item 5, onwards, but Tool No. RG 4221-B is used in place of the press to compress the housing.
|
 **
**