|
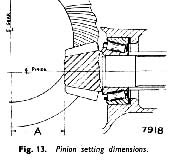
should bear the same reference number, i.e. a casing marked L1 should have an L1 set fitted, but an 00 or L2 may be used in lieu. Similarly, a casing marked H2 should have an H2 set fitted, but an Hi Is acceptable The number at the bottom gives the cone setting distance of the pinion, and may be Zero (0), Plus (+) or Minus(-) When correctly adjusted a pinion marked Zero (0) will
be at the zero cone setting distance, dimension ‘A’ In Fig. 13, from the centre line of the crown wheel to the
face of the pinion, which Is 2.625 in. (66.67 mm). Thus, for a pinion marked —2, the distance ‘A’ will be 2.623 in. (that Is 2.625 in.—.002 in.), and for a pinion marked +3, the distance ‘A’ will be 2.628 in. (that is 2.625 in. + .003 In.).
To obtain this measurement, install the pinion inner bearing cup, as described in the first paragraph of this section. Should it be necessary to rebuild without knowing the original shim sizes, install shims to the value of .025 in. (.633 mm.), as a starting basis.
Place the pinion, with the inner bearing cone assembly, into the gear carrier, and rotate to seat the bearing. It is not necessary to retain the pinion in any way while checking the cone setting distance, as the weight of the pinion will keep it in place.
Set up the clock gauge, Tool No. SL.3P, on a surface plate, and using the setting block provided, adjust the clock to read zero. This is now set to zero cone setting distance of 2.625 in.
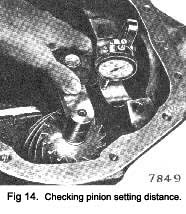
Attach the magnetic base of the gauge unit to the ground face of the pinion, and take a reading from the differential bearing bore. (See Fig. 14).
Slight movement of the gauge will give a minimum reading, which when the pinion is set correctly, will be -the zero reading set by the gauge block, plus or minus the figure on the pinion face, whichever is applicable. Take the clock gauge readings carefully, noting the direction of the variation as well as the amount.
|
If the clock gauge reads higher (+) than the correct setting figure, insert shims to rectify, if the gauge reads lower (—), remove to rectify.
Should it be necessary to remove the pinion bearing cup to change the shims, the shims will inevitably be damaged, and must be renewed.
When the correct pinion setting has been obtained, turn the carrier over and support the pinion on a block of wood. Install the original outer bearing shims on the pinion shank, thick shim first.
Should it be necessary to rebuild without knowing the original shim sizes, install shims to the value of .115 in. (2.9 mm.) to start. Fit the pinion outer bearing cone, coupling, washer and nut only, omitting the oil seal and slinger, and tighten the nut to the torque given in the General Data Section.
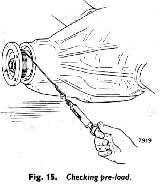
Check the preload by wrapping a 3 ft. (1.M) length of cord round the coupling, and attaching a spring balance to the cord. See Fig. 15.
|
 **
**