|
REAR AXLE - Removal
In order to carry out any rectifications to the differential unit, it is necessary to remove the rear axle from the car. It is not essential to remove the axle from the vehicle if the work is limited to removal and replacement of the axle shaft or shafts.
Jack up the car under the rear axle and place blocks forward of the road spring front mounting. Lower car to blocks, retain jack.
Remove the nave plates and road wheels. Release the handbrake.
Disconnect the handbrake cable at the clevis pin on the front end of the cable housing, and withdraw the cable through the hole in the body floor.
Disconnect the flexible brake pipe from the clip on the body.
Remove the bolt, washers and rubber buffer from the bottom of the two rear shock absorbers.
Remove outer bolt and rubber from the panhard rod, at the axle mounting bracket.
Release the locknut, and screw the adjustment inwards until the end of the rod clears the bracket.
Remove the four bolts and nuts securing the prop shaft to the pinion flange, and tie the shaft up clear of the axle.
Remove the R.H. exhaust tail pipe and expansion box assembly. A joint just forward of the expansion box is provided for this purpose.
Having cleared the axle of all attachments, clean the threads of the axle ‘ U bolts, by means of a wire brush.
Unscrew the retaining nuts, tap the ‘U’ bolts clear of the mounting plates, and remove.
Lift the axle by means of the jack to clear the centre bolts in the springs.
Remove the R.H. rear lower spring shackle bolt, slacken the front shackle bolt and lower the rear end of the spring.
Slide the axle to the right until the hub is clear of the spring and exhaust pipe, tip the axle to one side and lower. The axle may then be drawn out from under the car.
REFITTING
Refitting is the reverse of the removal procedure, but it will be necessary to bleed the brakes as described in Section K and to check the setting of the panhard rod as described in Section H, Rear Suspension. Tighten all shackle bolts with the car standing under its own weight.
|
REMOVING THE DIFFERENTIAL
ASSEMBLY
Remove the axle assembly as described on this page.
Remove the axle shafts as described on Page 3.
Four methods of removing the differential are described below.
METHOD 1.
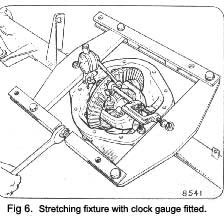
Using the stretching fixture tool (Fig. 6).
- Drain the lubricant from the gear carrier housing and remove the gear carrier rear cover.
- Flush the unit out thoroughly in order that the parts can be carefully inspected.
- To remove the differential proceed as follows:-
- Withdraw the four bolts securing the two differ-ential bearing caps, and remove the caps.
- Fit the stretching fixture, Tool No. SL.1-A (Fig. 6). The fixture must be adjusted to suit the dimensions of the axle, a series of holes being provided in the member opposite the turnbuckle, for this purpose.
- Fit up a clock gauge as shown in Fig. 6 using a suitable stud; which should be a minimum of 4 In. (101 mm.) in length, when screwed into one of the bait holes in the housing.
- Set the clock gauge with a pre-load on the Inside of the gear carrier housing, adjacent to the axle shaft tube, and set the dial to zero.
- Operate the spreader fixture by means of a spanner on the turnbuckle. The clock gauge will register the amount of spread.
|
 **
**