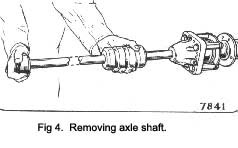
IT IS ESSENTIAL during this removal process to maintain the inner race in full contact with the outer cone, by continual outward pressure on the removal tool. If any slack is allowed to develop, the action of the tool will cause the rollers to indent the outer cone face, damaging the bearing.
Examine the shaft oil seal which is pressed inside the axle tube, and if necessary withdraw and fit a replacement.
Examine the hub bearing and if a replacement is neces-sary withdraw the Inner race from the axle shaft by the use of a press.
Fit the replacement bearing (if required) making sure that the cone is pressed squarely on to the shoulder on the shaft. If the bearing is not fitted correctly, it will creep in use, resulting in excessive shaft end float with subsequent damage to the bearings. Use tool No. SL. 14-I with the narrow flange towards the bearing cone as a press adaptor.
REFITTING
This operation is the reverse of the removal procedure but the following points must be observed
Wash the hub bearing so that the axle shaft end float may be determined accurately.
Install the shaft with the taper roller Inner race, taking care not to damage the oil seal.
Assemble the bearing outer race, making absolutely sure that the race enters the housing squarely.
|
IT IS ESSENTIAL to grease hub bearings with the recommended lubricant (Retinax ‘A ‘).
Examine the shims, backing plate, bearing retainer plate with two new paper gaskets and oil seal.
Check the axle shaft end float as in Fig. 5, with a dial indicator assembly, after gently tapping each axle shaft end with a rawhide mallet, to ensure that the bearing cups are butting against the retaining plates.
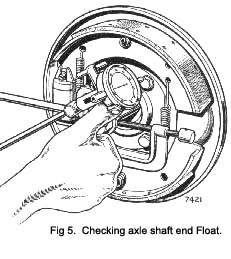
Add or subtract adjusting shims as necessary to obtain the correct end float of .OO6 in. to .008 in. (.15 to 20 mm.). Adding shims Increases end float, subtracting shims decreases end float.
Remove or install an equal thickness of shims at each end of the axle in order to retain the axle shaft spacer in a central position.
Reconnect the handbrake cable and hydraulic pipe connections.
Refit hubs and brake drums.
Bleed and adjust brakes as described in Section K.
|
 **
**