|
METHOD 4.
Emergency operation
In extreme emergencies it is possible to force the differ-ential unit out of the housing, and to re-install the assembly, by slightly tilting the bearings and tapping lightly with a hide mallet.
Naturally, this method increases the necessity of avoiding damage to the gear teeth, and extreme care is necessary to avoid damage to the differential bearings.
This procedure is NOT RECOMMENDED, and must be reserved strictly for emergencies.
To remove the pinion
Remove the pinion nut and washer, holding the coupling with V.L.C. Tool No. RG.421
Withdraw the coupling flange with a suitable puller. Press the pinion out of the outer bearing.
It is important that the pinion should be pressed and not driven out to prevent damage to the outer bearing.
The pinion having been pressed from the outer bearing may now be removed from the gear carrier housing.
Be sure to keep all shims intact.
Remove the pinion oil seal together with the oil slinger and the outer bearing cone.
Examine the inner bearing for wear and if replacement required, extract the bearing cup, using a soft drift and hammer. Great care must be taken to remove and refit the cup evenly, to avoid distortion. The shims will in-evitably be damaged by this method, and must always be replaced.
|
Dismantling the differential
Bend down the tabs on the locking straps and remove the drive gear screws.
Remove the drive gear from the differential case by tapping with a rawhide mallet.
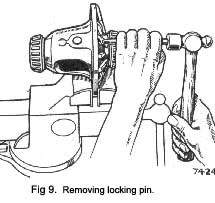
Using a small punch, drive out the pinion mate shaft locking pin (See Fig. 9) and remove the pinion mate shaft. Note the locking pin can only be removed in the direction shown in Fig. 9.
Remove the axle shaft spacer.
Rotate the side gears by hand until the pinions are opposite the openings in the case, then remove the differential gears, care being taken not to lose the thrust washers.
If the drive gear setting is to be altered, it will be necessary to withdraw the differential bearings using tool No. RG.4221B and SL.14-3 to gain access to the shims located between the bearings and the abutment face on the differ-ential case.
ASSEMBLING THE DIFFERENTIAL
Assemble the side gears with the thrust washers in position. Insert the differential pinions through the opening in the case and mesh them with the side gears. Hold the pinion thrust washers on the spherical thrust faces of the pinions while rotating the differential gear assembly into its operating position by hand.
Line up the pinions and thrust washers, then install the pinion mate shaft with the axle spacer washer in position. Line up the cross hole in the shaft with the hole in the case and install the lock pin. Using a punch peen some of the metal of the case over the end of the lock pin to prevent its working loose and causing extensive damage to the axle assembly.
Clean the drive gear and differential case mating surfaces and examine carefully for burrs.
Align the bolt holes in the drive gear with those in the flange of the differential casing, and gently tap the drive gear home on the case with a hide or lead hammer.
Insert the drive gear bolts, using NEW locking straps and tighten them uniformly, finality using a torque spanner and tighten to the torque figure given in the General Data section. Bend the lock top round the bolt heads to prevent their working loose.
The procedure for fitting the differential case assembly into the gear carrier is given under the heading “Dif-ferential Bearing Adjustment “.
|
 **
**