10. Position the fibre thrust washer on the commutator-end of the armature shaft and position the armature in the starter frame.
11. Position the starter drive gear actuating lever to the frame and starter drive assembly, and Install the pivot pin.
12. Position the starter drive actuating lever return spring and the drive gear housing to the frame. Refit and tighten the ‘through ‘ bolts.
Note—Ensure that the brush leads do not become trapped between the brush plate and the frame. Also ensure that the stop ring retainer is seated correctly in the drive-gear housing.
13. Refit the brushes in their respective brush holders and centre the brush springs on the brushes.
14. Position the drive gear actuating lever coyer on the starter and refit the brush cover-band with a gasket. Tighten the band retaining screw.
15. Check the starter no-load amperage draw.
Starter drive renewal
1. Loosen and remove the brush cover-band and the starter drive actuating lever.
2. Loosen the through’ bolts, enough to allow removal of the drive gear housing and the starter drive actuating lever return spring.
3. Remove the pivot pin retaining the starter drive actuating lever and remove the latter.
4. Remove the drive gear stop-ring retainer and stop-
|
ring from the end of the armature shaft, and remove the drive gear assembly.
5. Apply a thin coating of lubricant on the armature shaft splines. Refit the drive gear assembly on the armature shaft and install a new stop-ring.
6. Position the starter actuating lever on the starter frame and refit the retaining pivot pin.
Note—Ensure that the actuating lever is correctly engaged with the starter drive assembly.
7. Fit a new retaining clip retainer. Position the starter drive actuating return spring and drive gear housing to the starter frame, then tighten the through bolts.
8. Position the starter actuating-lever cover and the brush cover-band, with gasket, on the starter. Tighten the brush cover-band retaining screw.
Brush renewal
Renew the starter brushes when they are worn to within -~ in. (7.937 mm) of their total length. Always install a complete set of new brushes.
1. Loosen and remove the ~brush cover-band and starter drive actuating lever cover ; Remove the brushes from their holders.
2. Remove the two ‘through’ bolts from the starter frame.
3. Remove the drive gear housing, and the actuating lever return spring.
4. Remove the starter drive actuating lever pivot retaining pin and lever, and remove the armature.
5. Remove the brush end-plate.
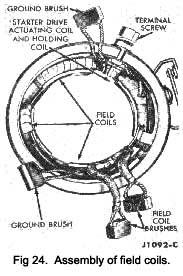
6. Remove the ground brush retaining screws from the frame and remove the brushes (cut the ground brush nearest the starter terminal from the brush terminal block, as close to the brush lead terminal as possible).
7. Unsolder (or cut) the insulated brush leads from the field coils, as close to the field connection point as possible.
8. Clean and inspect the starter motor.
9. Renew the brush end plate if the insulator between the field holder brush and the end plate is cracked or broken.
10. Solder the new field brushes to the field coils.
11. Install the ground brush leads to the frame with the retaining screws.
12. Clean the commutator with Grade 0 or Grade 00 glass-paper.
13. Position the brush end-plate to the starter frame, with the end plate boss in the frame slot.
14. Position the fibre washer on the commutator end of the armature shaft and install the armature in the starter frame.
|
 **
**