|
If there is a zero voltage reading, check the switch, cables and connections.
If there is low voltage reading i.e., appreciably below 11.5 volts, excessive current flow in the motor is indicated, caused by either an internal fault or excessive mechanical loading in the cable rack transmission. -
Measure light running current and speed
Disconnect the cable rack at the gearbox ; to do this, first mark the position of the domed limit switch cover with relation to the gearbox cover. Withdraw the four self-tapping screws which secure the gearbox cover and lift off the cover. Take off the spring clip which secures the connecting rod on the crankpin, also removing the rotating limit switch ; the connecting rod can now be lifted off.
Connect a first grade moving-coil ammeter in the motor supply cable and measure the light running current. Also observe the operating speed by counting the speed of rotation of the final gear. The light running current should not exceed 34 amperes, and the gear speed should be between 44 to 50 r.p.m. (after running for 60 seconds). If the motor does not run, or the light running current and speed are not as stated, an internal fault in the motor is indicated ; a new motor must be fitted, or the existing motor removed for further examination.
Check cable rack, tubing and wheelboxes
If the light running current and speed are correct, then the cause of the trouble most probably lies in the cable rack transmission.
The maximum permissible force required to move the cable rack in its protective tubing, should be not more than 6 lb. (27 Kg.). This can be checked while the cable rack is disconnected from the gearbox. First take off the arms and blades, then hook a spring balance into the hole in the crosshead into which the pin on the connecting rod is normally fitted. Withdraw the rack with the balance, noting the force required.
Binding of the rack can be attributed to kinked or flattened tubing, or to faulty installation. Any badly kinked or flattened tubing must be renewed. Any curves of less than 9 inches (23 cm.) radius must be reformed. The cable rack must be well lubricated with grease.
When the cable rack is removed, check the wheelboxes for looseness, misalignment or binding of the spindle, and rectify or renew as found necessary.
|
Reconnecting Cable Rack:
This is a reversal of the procedure outlined above, taking care to refit the domed limit switch cover in its original position. Ensure that the hexagon nut which secures the tubing to the gearbox is not cross-threaded.
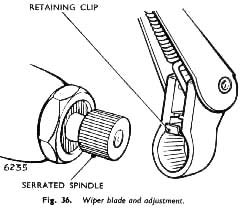
To remove and refit wiper arms (See Fig. 36)
Before refitting wiper arms after removal, ensure that the wheelbox spindles are in the correct parking position, by switching on the motor and then switching off and waiting for them to come to rest at the end of a stroke. Fit the arms and blades to the serrated driving drums on the wheelbox spindles at the correct parking angle until the retaining clip snaps over the end of the drum. Switch ON and note the arc of wipe. If necessary, the position of the arms can be adjusted by removing and re-engaging them in the appropriate position, the pitch of the driving drum serratlons being 5°. Do not attempt to turn the arms on the spindles, but press back the retaining clip and withdraw the arms from the driving drums.
Limit switch adjustment
The correct working of the limit switch is obtained when the setting pip on top of the domed cover is in line with (In a position either nearest to or furthest from) the central groove in the gearbox cover. Parking of the blades in the opposite extreme position can be effected by slackening the four gearbox cover screws and rotating the limit switch cover through 180° before retightening the screws.
|
 **
**