4. Clean the carbon and other foreign matter from the brush end-plate. Repair or renew the insulation between the brush holders and end-plate, also the armature terminal and end-plate if it is worn or cracked. Clean the commutator with fine’ glass paper.
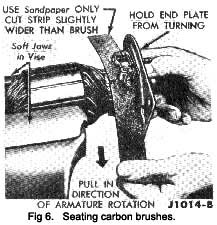
5. Ensure that the new brushes slide freely in their holders and seat the new brushes by lightly sanding them as indicated in the illustration attach the brush terminal connections.
6. Retract the brushes until the brush springs ride against the side of the brushes, so as to retain them in the retracted position.
7. Refit the armature and front end-plate, taking care to align the dowel, locating boss and frame slots.
8. Refit the ‘through” bolts and locking washers.
9. Using a strand of stout wire formed with a hooked end, relieve the brush springs momentarily and allow the brushes to seat on the commutator.
Armature renewal
1. Remove the two through ‘ bolts and brush end-plate, and then slide the armature and front end-plate assembly from the frame.
2. Clamp the armature in a vice formed with soft-jaws, and remove the retaining nut, locking washers, pulley and woodruff key.
3. Remove any burrs or scratches from the keyway or shaft, and slide the front end-plate from the shaft.
4. Refit the existing front end-plate on the new armature.
5. Refit the existing woodruff key, pulley, locking washer and retaining nut.
6. Fit new brushes in the brush end-plate, retract the
|
brushes, until the brush springs ride against the side of the brushes so as to retain them in the relieved position.
7. Slide the armature and front end-plate assembly into the frame, aligning the dowel with the frame slot.
8. install the end plate (aligning the dowel and the frame slot) and install the ‘ through ‘ bolts with locking washers and nuts.
9. Using a length of stout wire formed with a hooked end, position the brush springs on top of their brushes to retain them in contact with the com-mutator.
Cleaning and Inspection
1. Wash all parts except the armature, field coils, and ball bearings in solvent and dry the parts thoroughly.
2. Wipe off the armature and field windings, the commutator, and the armature shaft.
3. Check the condition of the bearings. If the ball bearings are worn, or have lost their lubricant, they must be renewed.
4. Check the armature winding for worn insulation, overheating, and unsoldered connections.
5. Check the armature for shorts, opens or earthing.
6. Check the field windings for worn Insulation and unsoldered connections at the terminal screws. Check the current draw with a 12 volt supply, if the current draw is not within the limits given In the General Data, renew the field winding. Resolder any connections as required.
7. Renew the armature or the field coils if the In-sulation is worn or if an open, short or earthed circuit is indicated.
8. Check the commutator for runout and uneven or scored surfaces. ‘Turn’ down the commutator and undercut the mIca if necessary.
9. Inspect the brush end-plate for poor, Insulation or loose rivets. Renew the end-plate if the positive brush insulation is broken or cracked. Tighten any loose brush holder rivets.
Check the brush spring tension. If the tension is not within the limits given In the General Data, renew the springs.
Assembly (Refer to Fig. 3)
1. Refit the field coils on the pole shoes, and mount the shoe and call assemblies in the frame.
2. Tighten the field pole-shoe screws as shown in Fig. 4. As the screws are tightened, strike the frame several sharp blows with a hide faced hammer in order to seat and align the pole shoes. After-wards, stake the screws.
|
 **
**