|
15. Install the starter drive gear actuating lever to the frame and starter drive assembly, and install the starter frame.
16. Position the return spring on the actuating lever and the drive gear housing to the starter frame. Install the ‘through ‘ bolts and tighten to the specified torque. Be sure that the snap-ring retainer is seated correctly in the drive gear housing.
17. Install the commutator brushes in the brush holders. Centre the brush springs on the brushes.
18. Position the actuating lever cover and ‘the brush cover-band, with gasket, on the starter. Tighten the band retaining screw.
19. Check the starter no-load current draw.
Armature renewal
1. Loosen the brush cover-band retaining screw and remove the brush cover and the starter drive actuating lever cover. Remove the brushes from their holders.
2. Remove the ‘through’ bolts, starter drive gear housing, and the starter drive actuating lever return spring.
3. Remove the pivot pin retaining the starter gear actuating lever, and remove the lever.
4. Remove the armature. If the starter drive assembly is being used again, remove the stop-ring retainer and the stop ring from the end of the armature shaft, and remove the assembly.
5. Place the starter drive gear assembly on the new armature with a new stop ring.
6. Install the fibre thrust washer on the commutator end of the armature shaft and Install the armature.
7. Position the starter gear actuating lever to the frame and. drive gear assembly and Install the retaining pivot pin.
8. Position the starter drive actuating lever return spring, starter drive gear housing, and the brush plate to the starter frame, and then Install and tighten the ‘through bolts. Ensure that the stop ring retainer is seated correctly in the drive-gear housing.
9. Place the brushes in their holders, and centre the brush springs on the brushes.
10. Position the actuating lever cover and the brush cover-band, with gasket, and then tighten the retaining screw.
TESTING THE STARTER MOTOR
(Refer to Fig. 25)
Starter motor load test
Connect the test equipment as indicated in the illus-tration. Ensure that no current is flowing through the
|
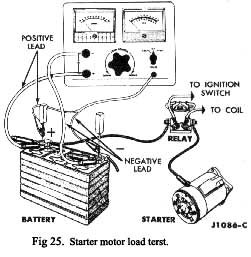
ammeter and heavy-duty carbon pile rheostat portion of the circuit (rheostat at maximum resistance).
Crank the engine with the ignition OFF, and determine the exact reading on the voltmeter. This test is ac-complished by disconnecting and earthing the high tension lead from the ignition coil, and by connecting a “jumper” from the battery terminal of the starter relay to the ignition switch terminal of the relay.
Cease cranking the engine and reduce the resistance of the carbon pile until the voltmeter indicates the same reading as that obtained during the period the starter was in operation. The ammeter will indicate the starter current draw under load.
Starter motor no-load test
The starter motor no-load test will reveal such faults as open or shorted windings, rubbing armature and bent armature shaft. The starter can be tested, at no-load, on, the test bench only.
Make the test connections as shown in the illustration. The starter will run at no-load. Be sure that no current is flowing through the armature (rheostat at maximum anti-clockwise position). Determine the exact reading on the voltmeter. Disconnect the starter from the battery and reduce the resistance of the rheostat until the voltmeter indicates the same reading as that obtained while the starter was in operation. The ammeter will indicate the starter no-load current draw.
|
 **
**