Direction Indicators
The correct operation of direction signals requires that the bright filament in the parking and tail lamp bulbs (depending on the position of the switch) flash inter-mittently whether or not the headlamps, parking lamps, tail lamps or stop lamps are "on". A correctly operating direction signal will be indicated by a regular intermittent flashing of the green pilot lamp located on facia panel in front of the driver. If, when the direction indicator is switched on, the warning (or pilot) lamp does not flash in the usual manner but remains unlit, first, check that this is not due to filament failure in either the front or rear lamp on that side. This can be checked by turning the switch to the opposite side—if the pilot lamp now flashes, the circuit is in order and bulb replacement is indicated. On the other hand, if the pilot lamp still does not flash, inspect the indicator lamps. If these are working normally, failure of the pilot lamp bulb is indicated. If, however, the indicator lamps are not functioning, it will be neces-sary to proceed to check the wiring and flasher unit.
The efficiency of the flasher unit can be readily checked by plugging in a known substitute.
The inoperative parking or rear flasher lamp bulbs should be checked for a burned-out bright filament. Where it is found that neither lamp has a burned-out filament the wiring between the defective lamp and indicator switch must be checked.
If the direction signal is entirely inoperative, check the fuse (4 on fuse box), flasher unit and circuit from the fuse box up through the steering column switch in the order named.
The flasher unit is located inside the car and is plugged into a socket on the underside of the facia. No servicing of the flasher is required, and where this unit breaks down in service it must be renewed.
It is important to note that the twin filament bulbs used
|
in the side and tail lamps (Lucas 380 12 v. 21/6w.) are the same type. These bulbs have offset pins and cannot be fitted incorrectly.
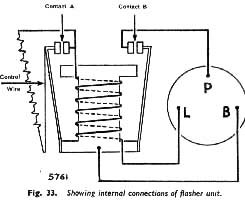
Operation of flasher unit (See Fig. 33).
This unit depends for its operation on an electro-magnet in conjunction with the linear expansion of a piece of wire which becomes heated as current flows through it.
The expanding and contracting of the wire controls the speed at which the armature carrying the moving contact will move, as a result of the pull exerted by the electro-magnet and the sequence of operations Is as follows
As current flows from terminal “B” to terminal “L” and the lamps via the resistance wire and electro-magnet, the wire heats up and expands.
This allows the armature carrying one of the contacts to be attracted to the pole piece of the electro-magnet closing contacts (A) and full voltage is then applied to the lamps via the windings of the electro-magnet. Contacts (B) are also closed completing the pilot lamp circuit.
While contacts (A) are closed the resistance wire is short circuited and cools off. The taut section of the resistance wire contracts and pulls back the armature to open contacts (A).
The pilot lamp on the facia panel will not flash unless |
 **
**