SERVICING
Removal and refitting the generator
(Refer to Fig. 2)
To remove
1. Disconnect the armature, field and earth wires at the generator.
2. Remove the adjustment arm to generator bolt, the drive belt and the two pivot bolts from the, mounting bracket.
3. Detach the generator.
To refit
1. Clean the mating surfaces of the generator frame and mounting bracket.
2. Refit the generator to the mounting bracket with the two pivot bolts and lock washers.
3. Refit the generator drive belt and the adjustment arm to tile generator bolt then, adjust the drive belt tension as described in Section B of this pub-lication.
4. Re-connect the armature, field and earth to the generator terminals. Start the engine and check for correct operation of the generator.
Dismantling (Refer to Figs. 3 and 4)
1. Remove the two generator ‘through’ bolts and the brush end-plate and slide the armature from the opposite end of the frame, taking care not to lose the locating dowel should It fall out of the front end-plate then, remove the brushes, brush arms and springs from the brush end-plate.
2. Clamp the armature in a vice formed with soft-jaws, and remove the retaining nut, locking washer, pulley and woodruff key; from the armature shaft.
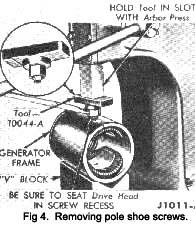
3. Remove the field and earth terminal screws from the generator frame, and unscrew the field pole shoe retaining screws as shown in the Illustration, Fig. 4.
4. Slide the pole shoes and field windings from the frame, and separate the windings and shoes.
Commutator turning and undercutting
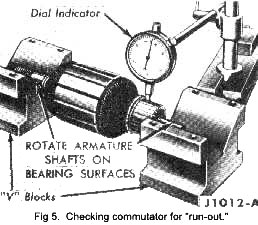
(Refer to Fig. 5)
Check the commutator for “ run-out” as indicated in the illustration. Should the surface of the commutator be rough or more than 0.002” In. (0.050 mm.) out of round, “turn” it down in a lathe.
|
Brush renewal (Refer to Fig. 6)
Renew the generator brushes if they are not within their wear limits. Always change both brushes when renewal is required. Should the brush wear be excessive, check the condition of the commutator and ‘turn ‘ down and undercut as necessary.
1. Remove the two’ through ‘bolts from the generator frame.
2. Remove the brush end-plate, the armature and the front end-plate assembly from the generator frame.
3. Disconnect the brush terminals and remove the brushes.
|
 **
**