the throttle valve vacuum line at the intake manifold.
3. Disconnect the high tension lead and wires at the coil. Remove the coil from the intake manifold.
4. Disconnect the spark plug wires at the spark plugs by grasping the moulded cap only. Remove the wires from the harness brackets on the valve rocker arm covers. Remove the distributor cap and spark plug wire assembly.
5. Remove the carburettor fuel inlet line and the automatic choke heat tube.
6. Disconnect the distributor vacuum line. Remove the distributor hold down bolt and remove the distributor and vacuum line.
7. Disconnect the radiator upper hose at the coolant outlet housing, and the water temperature sending unit wire at the sending unit. Remove the heater hose from the automatic choke housing and dis-connect the hose at the intake manifold.
Loosen the clamp on the water pump bypass hose at the coolant outlet housing and slide the hose off the outlet housing.
9. Disconnect outlet vent hose at the carburettor spacer.
10. Remove the Intake manifold and carburettor as an assembly. Remove the intake manifold gaskets and seals. Discard the Intake manifold retaining bolt sealing washers.
11. If the manifold is to be disassembled, remove the coolant outlet housing, gasket and thermostat. Remove the temperature sending unit, carburettor, spacer and gaskets.
Cleaning
Remove all gasket material from the machined surfaces of the manifold. Clean the manifold in a suitable solvant and dry it with compressed air.
Inspection
Inspect the manifold for cracks, damaged gasket surfaces, or other defects that would make it unfit for further service. Replace all studs that are stripped or otherwise damaged. Remove all filings and foreign matter that may have entered the manifold as a result of repairs.
Installation
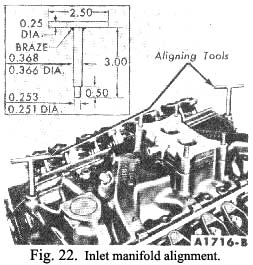
Intake manifold alignment tools are required when installing the intake manifold on the cylinder block and cylinder heads. Fabricate two alignment tools according to the specifications shown in Fig. 22.
|
1. If the intake manifold was disassembled, install the temperature sending unit (threads coated with electrical conductive sealer), carburettor, spacer and gaskets. Position the thermostat In the Intake manifold. Coat the thermostat gasket with water-resistant sealer and position it on the intake mani-fold. Install the coolant outlet housing.
2. Clean the mating surfaces of the intake manifold, cylinder heads and cylinder block. Coat the cylinder block seal surfaces with oil-resistant sealer.
3. Position new seals on the cylinder block and new gaskets on the cylinder heads with the gaskets inter-locked with the seal tabs. Be sure the holes in the gaskets are aligned with the holes in the cylinder heads. The correct installation of the gaskets and seals is shown in Fig. 23.
4. Carefully lower the intake manifold into position on the cylinder block and cylinder heads. After the intake manifold is in place, run a finger around the seal area to make sure the seals are in place. If the seals are not in place, remove the intake manifold and position the seals.
S. Be sure the holes in the manifold gaskets and manifold are in alignment. Position the Intake manifold alignment tools (Fig. 22) in the front and rear bolt holes (Nos. 10 and 12) on the left bank of the manifold.
|
 **
**