CLUTCH PILOT BUSHING REPLACEMENT
1. Remove the transmission, clutch pressure plate and disc following the procedures in Section D.
2. Remove the pilot bushing as shown In Fig. 95.
3. Coat the pilot bushing bore in the crankshaft with a small quantity of wheel bearing lubricant. Avoid using too much lubricant as it may be thrown onto the clutch disc when the clutch revolves.
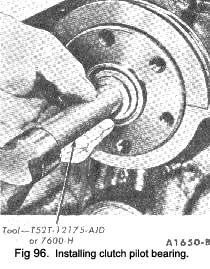
4. Install the pilot service bearing as shown in Fig. 96.
5. Install the clutch pressure plate, disc and the transmission.
ENGINE—To dismantle
1. Install the engine on the workstand.
2. Remove the distributor cap and spark plug wire assembly.
3. Disconnect the distributor vacuum line at the distributor. Remove the carburettor fuel inlet line and fuel pump outlet line. Remove the oil filter.
4. Slide the clamp on the water pump bypass hose toward the water pump. Remove the automatic choke-heat tube.
5. Disconnect the crankcase vent hose at the car-burettor and regulator valve. Remove the regulator valve from the valve rocker arm cover. Remove the valve rocker arm covers.
|
6. Remove the generator and mounting -bracket. Remove the ignition coil.
Remove the distributor hold down bolt and remove the distributor.
7. Remove the intake manifold retaining bolts. Raise the manifold and carefully remove it from the engine. Discard the Intake manifold gaskets, seals and sealing washers.
8. Loosen the valve rocker arm stud nuts so that the valve rocker arms can be rotated to the side. Remove the valve push rods in sequence and put them in a rack or holder so that they can be installed in their original position.
9. Using a magnet, remove the valve lifters and place them in a rack so that they can be installed in their original bores (Fig. 51).
If the valve lifters are stuck in their bores by ex-cessive varnish, etc., it may be necessary to use a plier-type tool (T52T-6500-DJD or 6500-D) to remove the lifters. Rotate the lifter back and forth to loosen it from the gum or varnish that may have formed at the lifter.
The internal parts of each hydraulic valve lifter assembly are matched sets. Do not intermix the parts. Keep the assemblies intact until they are to be cleaned.
10. Remove the exhaust manifolds and the spark plugs.
11. Install the cylinder head holding fixtures. Remove the cylinder head bolts and lift the cylinder heads off the block. Do not pry between the head and the block. Discard the cylinder head gaskets.
12. Remove the crankshaft pulley from the crankshaft vibration damper. Remove the cap screw and washer from the end of the crankshaft. Install the puller on the crankshaft vibration damper (Fig. 58) and remove the vibration damper.
13. Remove the oil pan to cylinder front cover retaining bolts. Remove the cylinder front cover retaining screws (one screw retains the fuel line bracket).
Remove the cylinder front cover and water pump as an assembly. Discard the gasket and remove the crankshaft front oil slinger.
14. Check the timing chain deflection and remove the timing chain and sprockets by following the pro-cedure given for” Cylinder Front Cover and Timing
|
 **
**