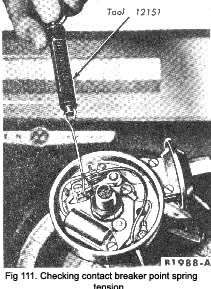
Pull the gauge at a right angle (90 deg.) to the movable arm until the breaker points just start to open (Fig. 111). If the tension is not to the figure given under “Ignition” In the Data Section, adjust the spring tension.
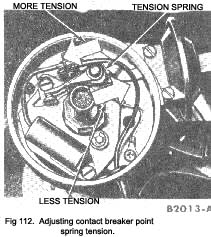
To adjust the spring tension (Fig. 112)
- Disconnect the primary lead wire and the condenser lead at the breaker point assembly primary terminal.
- Loosen the nut holding the spring in position.
Move the spring toward the breaker arm pivot to decrease tension and in the opposite direc-tion to increase tension.
- Tighten the lock nut, and then check spring tension. Repeat the adjustment until the specified spring tension is obtained.
Install the primary lead wire, and the condenser lead with the lock washer and tighten the nut securely.
DISTRIBUTOR—In-car adjustments and repairs
Disassembly
The distributor is shown fully dismantled in Fig. 107.
Removal of components
- Remove the primary wire from the coil. Unsnap the distributor cap retaining clips, lift the distributor cap off the distributor housing, and position the cap out of the way.
- Loosen the nut and pull the vacuum line out of the diaphragm assembly.
- Lift the rotor off the cam.
- Remove the spring clip securing the diaphragm link to the movable breaker plate. Disconnect the diaphragm assembly from the distributor housing. Lift the diaphragm link off the pin and remove the diaphragm assembly.
- Working from the inside of the distributor, remove the primary wire by pulling l~ through the opening in the distributor.
- Remove the two retaining screws and lift the entire
|
breaker plate assembly out of the distributor housing.
7. Lift the lubricating wick out of the cam. Using needle nose pliers, remove the cam retainer and lift the cam off the distributor shaft.
8. Lift the upper thrust washer off the distributor shaft. Carefully unhook and remove the distributor weight springs. Mark each spring and the adjusting bracket to which it is attached. Lift the weights out of the housing.
|
 **
**