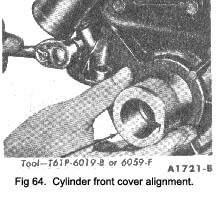
over the end of the crankshaft and against the block (Fig. 64). Coat the threads of the retaining screws with water-resistant sealer and install the screws (one screw retains the fuel line bracket). While pushing in on the pilot, tighten the screws. Remove the pilot.
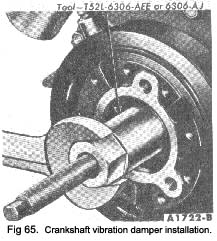
6. Line up the crankshaft vibration damper keyway with the key on the crankshaft. Install the vibration damper on the crankshaft (Fig. 65). Install the cap screw and washer. Torque the screw to 70 to 90 lbs. ft. Install the crankshaft pulley.
7. Install the oil pump and oil pan following the procedure under “Oil Pump Installation” and “Oil Pan Installation”.
8. Connect the dipstick tube bracket at the generator mounting bracket. Install the oil level dipstick.
9. Install the water pump pulley, drive belt, spacer and fan.
10. Install the generator support bolt at the water pump. Tighten the generator mounting bolts. Adjust the drive belt tension.
11. Connect the heater hose and the Water pump bypass hose. Slide the bypass hose clamp into position.
12. Connect the radiator upper and lower hoses. Connect the battery ground cable.
13. Fill and bleed the cooling system. Fill the crankcase with the proper grade and quantity of engine oil.
14. Operate the engine at fast idle and check for coolant and oil leaks. Check and adjust the ignition timing.
|
CAMSHAFT
The camshaft and related parts are shown in Fig. 66. It can be removed with the engine in position.
Removal
1. Remove the cylinder front cover and the timing chain following the procedure under Cylinder Front Cover and Timing Chain Removal
2. Disconnect the spark plug wires at the spark plugs and remove the wires from the ignition harness brackets on the valve rocker arm covers. Disconnect the coil high tension lead at the coil. Remove the distributor cap and spark plug wire assembly.
3. Disconnect the Ignition coil wires at the coil and remove the coil from the intake manifold.
4. Disconnect the distributor vacuum line at the carburettor. Remove the distributor hold down bolt and clamp and remove the distributor.
5. Disconnect the carburettor fuel inlet line at the car-burettor and fuel pump. Remove the fuel line. Disconnect the automatic choke heat tube at the carburettor. Remove the heater hose from the automatic choke and disconnect the hose at the Intake manifold.
On a car with an automatic transmission, dis-connect the throttle valve vacuum line at the intake manifold. Disconnect the transmission oil cooler lines at the radiator.
6. Remove the radiator and front grille.
7. Disconnect the accelerator cable at the carburettor. Remove the accelerator retracting spring.
|
 **
**