MAIN AND CONNECTING ROD BEARING
REPLACEMENT
The main and connecting rod bearing inserts are selective fit. Do not file or lap bearing caps or use bearing shims to obtain the proper bearing clearance.
Selective fit bearings are available for service in standard sizes only. Standard bearings are divided into two sizes and are identified by a daub of red or blue paint. Refer to the Parts Catalogue for the available sizes. Red marked bearings increase the clearance; blue marked bearings decrease the clearance. Undersize bearings, which are not selective fit, are available for use on journals that have been refinished.
Bolt torque loadings and bearing clearance specifications are given in the Data Section under “Crankshaft”.
Main bearing
1. Drain the crankcase. Remove the oil level dipstick. Remove the oil pan and related parts.
2. Remove the oil pump inlet tube assembly and the oil pump.
3. Replace one bearing at a time, leaving the other bearings securely fastened. Remove the main bearing cap to which new bearings are to be in-stalled.
4. Insert the upper bearing removal tool (tool 6331) in the oil hole in the crankshaft.
5. Rotate the crankshaft in the direction of the engine rotation to force the bearing out of the block.
6. Clean the crankshaft journal. When replacing standard bearings with new bearings, it is good practice to first try to obtain the proper clearance with two blue bearing halves.
7. To Install the upper main bearing, place the plain end of the bearing over the shaft on the locking tang side of the block and partially install the bearing so that tool 6331 can be inserted in the oil hole in the crankshaft. With tool 6331 positioned in the oil hole in the crankshaft, rotate the crankshaft in the opposite direction of engine rotation until the bearing seats itself. Remove the tool.
8. Replace the cap bearing.
9. Support the crankshaft so that its weight will not compress the Plastigage and provide an erroneous reading. Position a jack so that it will bear against the counterweight adjoining the bearing which is being checked.
10. Place a piece of Plastigage on the bearing surface the full width of the bearing cap and about 1/4in. off centre (Fig. 83).
11. Install the cap and torque the bolts to specifications. Do not turn the crankshaft while the Plastigage is in place.
|
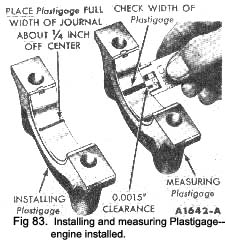
12. Remove the cap. Using the Plastigage scale, check the width of the Plastigage. When checking the width of the Plastigage, check at the widest point in order to get the minimum clearance. Check at the narrowest point in order to get the maximum clearance. The difference between the two readings is the taper.
13. If the clearance is less than the specified limits, try two red bearing halves or a combination of red and blue depending upon the condition, If the standard bearings do not bring the clearance within the desired limits, refinish the crankshaft journal, then install undersize bearings.
14. After the bearing has been fitted, apply a light coat of engine oil to the journal and bearings, then install the bearing cap Torque the cap bolts to specifications.
15. Repeat the procedure for the remaining bearings that require replacement.
16. If the rear main bearing is to be replaced, remove
the rear main bearing cap. Remove and discard the rear oil seal.
17. Clean the rear journal oil seal groove and the mating surfaces of the block and rear main bearing cap. Preform the new seal by hand to the approximate radius of the cap.
18. Insert the seal in the oil seal groove, seating the centre of the seal first and allowing the seal to extend equally on both ends. Press the seal down firmly with the thumb at the centre of the seal, then press both ends of the seal into the grooves working from the ends to the centre.
|
 **
**