HYDRAULIC VALVE LIFTER REPLACEMENT
- Remove the intake manifold and related parts by following steps given under Intake Manifold Removal
- Remove the crankcase ventilation regulator valve from the valve rocker arm cover. Remove the valve rocker arm covers. Loosen the valve rocker arm studs nuts and rotate the rocker arms to the side.
- Remove the valve push rods in sequence so that they can be installed in their original positions.
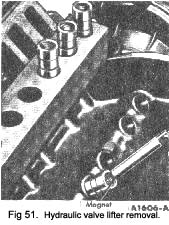
- Using a magnet, remove the valve lifters and place them in a rack so that they can be installed in their original bores (Fig. 51).
- If the valve lifters are stuck in their bores by exces-sive varnish, etc., it may be necessary to use a plier-type tool (T52T-6500-DJD or 6500-D) to remove the lifters. Rotate the lifter back and forth to loosen it from the gum or varnish that may have formed at the lifter.
- Clean and install the valve lifters in the bores from which they were removed. If a new lifter(s) is being installed, test the new lifter(s) for a free fit in the bore in which it is to be installed.
- Install the push rods in their original position. Apply Lubriplate to the valve stem tips and the push rod guides in the cylinder head.
- Position the rocker arms over the push rods. Perform a valve clearance adjustment as outlined on page 21.
|
8. Install the valve rocker arm covers, Install the crank case ventilation regulator valve in the valve rocker arm cover.
9. Install the intake manifold and related parts by following the procedure given under “Intake Manifold Installation “.
HYDRAULIC VALVE LIFTER
The lifter assemblies should be kept in proper sequence so that they can be installed in their original position. Inspect and test each lifter separately so as not to intermix the internal parts. If any part of the lifter assembly needs replacing, replace the entire assembly.
Dismantling
Each valve lifter is a matched assembly. If the parts of one lifter are intermixed with those of another, improper valve operation may result. Disassemble and assemble each lifter separately. Keep the lifter assemblies in proper sequence so that they can be installed in their original bores.
- Grasp the lock ring with needle nose pliers to re-lease it from the groove. It may be necessary to depress the plunger to fully release the lock ring.
- Remove the push rod cup, metering valve (disc), plunger and spring.
- Invert the plunger assembly and remove the check valve retainer by carefully prying up on it with a screwdriver. Remove the check valve (disc or ball check) and spring.
Cleaning
Thoroughly clean all the parts in clean solvent and wipe them with a clean, lint-free cloth.
Inspection
Inspect the parts and discard the entire lifter assembly if any part shows signs of pitting, scoring, galling, or evidence of non-rotation. Replace the entire assembly if the plunger is not free in the body. The plunger should drop to the bottom of the body by its own weight.
Assemble the lifter assembly and check for freeness of operation by pressing down on the push rod cup. The lifters can also be checked with a hydraulic tester to test the leak down rate. Follow the Instructions of the test unit manufacturer.
The internal parts of each hydraulic valve lifter assembly are matched sets. Do not intermix the parts. Keep the assemblies intact until they are to be cleaned.
4. Install the push rods in their original positions. Apply Lubriplate to the valve stem tips and the push rod guides in the cylinder head.
5. Install the rocker arms. Perform a valve clearance adjustment as outlined on page 21.
6. Position a new gasket(s) on the muffler inlet pipe(s). Connect the exhaust manifold(s) at the muffler Inlet pipe(s). Torque the nuts to specifications.
7. Position the generator and bracket and position the drive belt over the pulley, install the retaining bolts and adjust the drive belt tension as explained on page 20. Connect the generator wires.
|
 **
**