6. Install the lower main bearing inserts in the bearing caps.
7. Clean the rear journal oil seal groove and the mating surfaces of the block and rear main bearing cap. Preform the new seal by hand to the approximate radius of the cap.
8. Insert the seal in the oil seal groove, seating the centre of the seal first and allowing the seal to extend equally on both ends. Press the seal down firmly with the thumb at the centre of the seal, then press both ends of the seal into the groove, working from the ends to the centre.
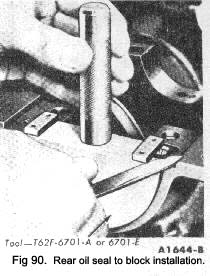
9. Position the seal forming tool as shown in Fig. 90 and complete the seal installation. After installation, cut the ends of the seal flush.
10. Carefully lower the crankshaft into place. Be careful not to damage the bearing surfaces.
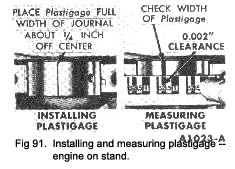
11. Check the clearance of each main bearing as follows Place a piece of Plastigage on the crankshaft journal
the full width of the journal and about 1/4 in. off-centre (Fig. 91). Follow steps 11-15 under Main Bearing Replacement.
12. After the bearings have been fitted, apply a light coat of engine oil to the journals and bearings. Install a new seal in the rear main bearing cap and install the rear main bearing cap by following steps 17 — 20 under “Main Bearing Replacement”. Install all the bearing caps, except the thrust
|
bearing cap (No.3 bearing). Be sure that the main bearing caps are installed in their original locations. Torque the bearing cap bolts to speci-fications.
13. Install the thrust bearing cap with the bolts finger-tight.
14. Pry the crankshaft forward against the thrust surface of the upper half of the bearing (Fig. 92).
15. Hold the crankshaft forward and pry the thrust bearing cap to the rear (Fig. 92). This will align the thrust surfaces of both halves of the bearing.
16. Retain the forward pressure on the crankshaft. Tighten the cap bolts to the Torque loading given in the Data Section (Fig. 92).
17. Force the crankshaft toward the rear of the engine.
18. Install a dial indicator so that the contact point rests against the crankshaft flange and the indicator axis is parallel to the crankshaft axis (Fig. 93).
19. Zero the dial indicator. Push the crankshaft forward and note the reading on the dial.
20. If the end play exceeds the wear limit given under “Crankshaft” end float in the Data Section, replace the thrust bearing. If the end play is less than the minimum limit, inspect the thrust bearing faces for scratches, burrs, nicks or dirt. If the thrust faces are not defective or dirty, they probably were not aligned properly. Install the thrust bearing and align the faces following the recommended proce-dure (steps 13, 14, 15 and 16), then check the end play.
21. Install new bearing inserts in the connecting rods and caps. Check the clearance of each bearing following the recommended procedure.
|
 **
**