Reassembly
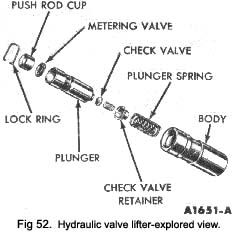
A hydraulic valve assembly is shown in Fig. 52.
1. Place the plunger upside down on a clean work
bench.
2. Place the check valve (disc or ball check) in position over the oil hole on the bottom of the plunger. Set the check valve spring on top of the check valve (disc or ball check).
3. Position the check valve retainer over the check valve and spring and push the retainer down into place on the plunger.
4. Place the plunger spring, and then the plunger (open end up) into the lifter body.
5. Position the metering valve (disc) in the plunger, then place the push rod seat in the plunger.
6. Depress the plunger, and position the closed end of the lock ring in the groove of the lifter body. With the plunger still depressed, position the open ends of the lock ring in the groove. Release the plunger, then depress it again to fully seat the lock ring.
Testing
Refer to page 19 for the testing procedures.
|
OIL PAN
Removal
- Drain the crankcase. Remove the oil level dipstick.
- Disconnect the starter cable at the starter. Remove the starter and dust seal.
- Remove the oil pan retaining bolts and crank the engine as required to obtain clearance and remove the oil pan.
- Remove the oil pump inlet tube and screen assembly.
- Remove and discard the inlet tube to pump gasket.
Cleaning
Scrape any dirt or metal particles from the inside of the pan. Scrape all old gasket material from gasket surface. Wash the pan in a solvent and dry it thoroughly. Be sure all foreign particles are removed from below the baffle plate.
Inspection
Check the pan for cracks, holes, damaged drain plug threads, a loose baffle, and a nicked or warped gasket surface.
Repair any damage, or replace the pan if repairs cannot be made.
Installation
- Clean the oil pump inlet tube and screen assembly.
- Using a new inlet tube to pump gasket, Install the inlet tube and screen assembly.
- Clean the gasket surfaces of the block and oil pan. The oil pan has a two-piece gasket. Coat the block surface and the oil pan gasket surface with sealer. Position the oil pan gaskets on the cylinder block (Fig. 53).
- Position the oil pan front seal on the cylinder front cover (Fig. 53). Be sure the tabs on the seal are over the oil pan gasket.
- Position the oil pan rear seal on the rear main bearing cap (Fig. 53). Be sure the tabs on the seal are over the oil pan gasket.
- Hold the oil pan in place against the block and install a bolt, finger-tight, on each side of the oil pan. Install the remaining bolts. Torque the bolts from the centre outward in each direction to specifications.
- Install the starter and dust seal. Connect the starter cable.
- Fill the oil level dipstick. Fill the crankcase with the proper grade and quantity of engine oil. Operate the engine and check for oil leaks.
|
 **
**