|
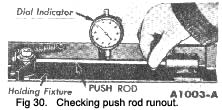
with the valve closed. They also can be checked with a dial indicator (Fig. 30).
If the runout exceeds the maximum limit at any point, discard the rod. Do not attempt to straighten push rods.
Rocker arm stud replacement
If it is necessary to remove a rocker arm stud, a rocker arm stud kit (tool T62F-6A527-A) is available which contains the following a stud remover, a 0006-ln. 0&Mac183;5 reamer, a 0015-in. 0.5 reamer and a stud Installer.
Rocker arm studs that are broken or have damaged threads may be replaced with standard studs. Loose studs in the head may be replaced with 0.006 or 001 5-in. oversize studs which are available for service. The
|
standard studs have no identification markings, whereas the O~OO6-in, oversize stud has two grooves around the pilot end of the stud and the 001 5-in. oversize stud has a step produced by the increased diameter of the stud approximately 1 5/32in. from the pilot end.
When going from a standard size rocker arm stud to a 0015-in. oversize stud, always use the 0006-In, reamer before finish reaming with the 0015-in. reamer.
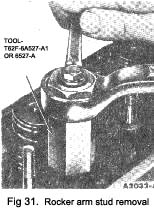
1. Position the sleeve of the rocker arm stud remover (tool T62F-6A527-A1) over the stud with the bearing end down. Thread the puller into the sleeve and over the stud until It Is fully bottomed. Hold the sleeve with a wrench, then rotate the puller clockwise to remove the stud (Fig. 31). If the rocker arm stud was broken off flush with the stud boss, use an easy-out to remove the broken stud following the instructions of the tool manufacturer.
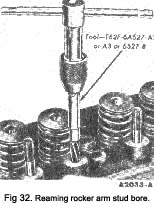
2. If a loose rocker arm stud is being replaced, ream the stud bore using the proper reamer (or reamers In sequence) for the selected oversize stud (Fig. 32). Make sure the metal particles do not enter the valve area.
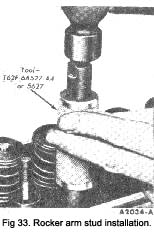
3. Screw the new stud into the sliding driver of the rocker arm stud Installer (tool T62F-6A527-A4) and coat the end of the stud with Lubriplate. Align the stud and installer with the stud bore, then tap the sliding driver until it bottoms (Fig. 33). When the installer contacts the stud boss, the stud is installed to its correct height.
|
 **
**