FLYWHEEL
Removal
1. On a car with a manual-shift transmission, remove the transmission, clutch pressure plate and disc.
On a car with an automatic transmission, remove the transmission and converter housing.
2. Remove the flywheel retaining bolts and remove the flywheel.
Inspection
Inspect the flywheel for cracks, heat check, or other defects that would make it unfit for further service.
Machine the friction surface of the flywheel lilt is scored or worn, ii it is necessary to remove more than 0.045-in, of stock from the original thickness, replace the flywheel.
If the teeth are damaged, replace the ring gear.
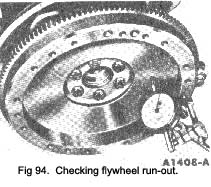
With the flywheel installed on the crankshaft, check the flywheel face runout.
Installation
1. Coat the threads of the flywheel retaining bolts with oil-resistant sealer. Position the flywheel on the crankshaft flange. Install and torque the bolts in sequence across from each other to specifications.
2. On a car with a manual-shift transmission, install the clutch pressure plate, disc and the transmission. On a car with an automatic transmission, install the transmission and converter housing.
|
Flywheel face runout—Manual-shift transmissions
Install a dial indicator so that the indicator point bears against the flywheel face (Fig. 94). Turn the flywheel making sure that it is full forward or rearward so that crankshaft end play will not be indicated as flywheel run out.
If the clutch face runout exceeds the amount given in the Data Section under “Flywheel ‘, remove the flywheel and check for burrs between the flywheel and the face of the crankshaft mounting flange.
If no burrs exist, check the runout of the crankshaft mounting flange. Replace the flywheel or machine the crankshaft flywheel mounting face if the mounting flange runout is excessive.
FLYWHEEL RING GEAR
The starter ring gear is a shrink fit onto the flywheel.
If necessary it can be removed and a new ring gear fitted.
To remove
Using a suitable size drill, drill a hole nearly through the starter ring between the bottom of two of the gear teeth. Further deepen this hole with a drill ground to flatten the drilled hole end. Split the ring gear with a sharp cold chisel and lift the split gear off of the flywheel.
To fit new ring gear
The new ring gear must be heated to a temperature of 2900C. (5500F.) before placing it on the flywheel. This should be done in a suitable oven fitted with a thermo-meter.
|
 **
**