**

Rootes Manual WSM.143/144
Section B (Engine)
1st Re-issue
Page 81


    13. Fill the grooves in the upper portion of the distri-butor shaft with a distributor cam lubricant.

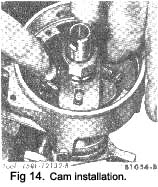
    14. Install the cam assembly (Fig. 124). Be sure that the slots in the cam engage the pins in the weights.

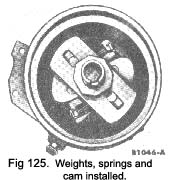
    15. Install the cam retainer. Apply a light film of cam lubricant to the cam lobes. Saturate the wick withSAE lOW engine oil. Install the wick in the cam assembly. The weights, springs, and cam are shown installed In Fig. 125.

    16. Position the stationary sub-plate in the distributor. Install one end of the ground wire under the plate retaining screw closest to the diaphragm mounting flange. (Fig. 126).

    17. Position the movable breaker plate in the distri-butor. Install the spring washer on the pivot pin. Place the flat washer on the spring washer. Be sure the protruding edges of the spring washer are facing upward. Install the retainer.

    18. Install a new breaker point assembly. Install the ground wire on the breaker point attaching screw furthest from the breaker point adjustment slot.

    19. Install a new condenser.

    20. Working from the inside to the outside of the distributor housing, pass the primary lead wire

    assembly through the opening in the distributor. Pull the wire through the opening until the locating stop is flush with the inside of the distributor.

    21. Connect the condenser wire and the primary lead wire to the breaker points.

    22. Position the diaphragm assembly and hook the diaphragm link over the pin on the breaker plate. Install the diaphragm assembly retaining screws. Secure the diaphragm link with a spring retainer.

    23. Refer to and make the following adjustments
    Breaker point spring tension.
    Align the breaker points and adjust the gap.
    Check the breaker point dwell and resistance.
    Centrifugal and vacuum advance.

New shaft and gear

The shaft and gear are replaced as an assembly. One
part should not be replaced without replacing the other. Refer to Fig. 107 for the correct location of the parts.


Editors Note: Our thanks to Jim Boynton for contributing this page.


  + The Roots of Rootes
  + History of the Tiger
  + Tiger Model Overview
  + Tiger Production
  + People & Pioneers
  + Workshop Manual
  + Factory Race Equipment
  + Literature: Books
  + Articles & Videos
  + Advertising

  + See Rootes Resources


  + History of the Tiger
  + Sunbeam Tiger 2005
  + Early Race History
  + Ken Miles, an appreciation
  + The "Beastie" explained
  + The Playboy Pink Tiger
  + Casting a Light on Lucas
  + LeMans at Goodwood 2002
  + Monterey Historics 2003
  + My Life With Cars

  + See Articles & Humor


  + High Perf. Exhaust
  + Tiger Dash Restoration
  + 350 Lunati Tiger
  + Installing a T5
  + Sound Advice
  + Installing New Carpet
  + The Ackerman Angle
  + "Cool It Buddy"
  + 3 Point Belts
  + Tiger Rotisserie Plans

  + Tiger E-Mail List Archives

  + See Technical Tips


  + Tiger Club Information
  + Events Calendar
  + Service Directory
  + Owner's Gallery
  + Buyer's Guides
  + Contributing Editors
  + Team Tiger Updates
  + Photo Gallery

  + See Online Resources

 
Anyone who would like to contribute to this effort should contact us at Editor E-Mail. Thank you.

Volunteers wishing to join our team are welcome. Take a look at our Contributing Editors
This site has been designed to pool the collective resources of the many great regional and national Sunbeam Tiger clubs. Membership to the these clubs is strongly recommended. Use our Clubs and Organizations Directory to find the organization nearest you and get involved.
**