22. After the connecting rod bearings have been fitted, apply a light coat of engine oil to the journals and bearings.
23. Turn the crankshaft throw to the bottom of its stroke. Push the piston all the way down until the rod bearing seats on the crankshaft journal.
24. Install the connecting rod cap and tighten the nuts to the Torque loading given in the Data Section.
25. After the piston and connecting rod assemblies have been installed, check the side clearance between the connecting rods on each connecting rod crankshaft journal (Fig. 73).
26. Clean the oil pan, oil pump and oil pump screen. Install the oil pump and oil pan.
27. Coat the threads of the flywheel retaining bolts with oil-resistant sealer. Position the flywheel on the crankshaft flange. Install and torque the bolts to the loading given in the Data Section.
On a flywheel for a manual-shift transmission, use tool 6392-N to locate the clutch disc, install the pressure plate. Tighten the retaining bolts.
28. Install the timing chain and sprockets, cylinder front cover and crankshaft pulley and adaptor, following procedure under "Cylinder Front Cover and Timing Chain Installation”.
29. Install the spark plugs, distributor cap and spark plug wires. Connect the spark plug wires and high tension lead.
30. Install the engine in the car.
|
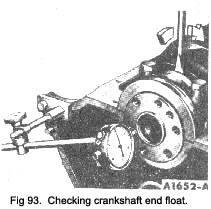
Crankshaft end play
1. Force the crankshaft toward the rear of the engine.
2. Install a dial indicator so that the contact point rests against the crankshaft flange and the Indicator axis is parallel to the crankshaft axis (Fig. 93).
3. Zero the dial indicator. Push the crankshaft forward and note the reading on the dial.
4. If the end play exceeds the wear limit (0.012 In.), replace the thrust bearing. If the end play is less than the minimum limit, inspect the thrust bearing faces for scratches, burrs, nicks, or dirt. If the thrust faces are not defective or dirty, they probably were not aligned properly. Install the thrust bearing and align the faces following the procedure recommended under “Main Bearing Replacements”. Check the crankshaft end play.
|
 **
**