Grind the valve seats to a true 45 angle (Fig. 42). Remove only enough stock to clean up pits, grooves, or to correct the valve seat runout. After the seat has been refaced, use a seat width scale to measure the seat width (Fig. 38). Narrow the seat, if necessary to bring it within specifi-cations.
If the valve seat width exceeds the maximum limit, remove enough stock from the top edge and/or bottom edge of the seat to reduce the width to specifications (Fig. 42).
Use a 300 angle grinding wheel to remove stock from the top of the seats (lower the seats) and use a 600 angle wheel to remove stock from the bottom of the seats (raise the seats).
The finished valve seat should contact the approximate centre of the valve face. It is good practice to determine where the valve seat contacts the face. To do this, coat the seat with Prussian blue, then set the valve in place. Rotate the valve with light pressure. If the blue is transferred to the centre of the valve face, the contact is satisfactory. If the blue is transferred to the top edge of the valve face, lower the valve seat. If the blue is transferred to the bottom edge of the valve face, raise the valve seat.
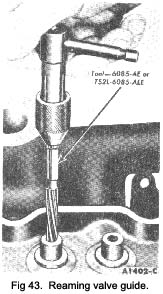
Reaming valve guides
If it becomes necessary to ream a valve guide (Fig. 43) to install a valve with an oversize stem, a reaming kit is available which contains the following reamer and pilot combinations a 0.003-in. O.S. reamer with a standard
|
diameter pilot, a 0015-in. 0.5. reamer with a 0003-in. 0.5. pilot, and a O&Mac183;030-in. reamer with a O&Mac183;O15-ln. 0.S. pilot.
When going from a standard size valve to an oversize valve, always use the reamers in sequence. Always reface the valve seat after the valve guide has been reamed.
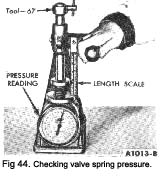
Valve spring pressure
Check the spring for proper pressure (Fig. 44) at the specified spring lengths given in the Data Section under “ Valves”. Weak valve springs cause poor engine performance therefore, if the pressure of any spring approaches the wear limit, replace the spring.
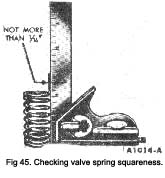
Valve spring squareness
Check each spring for squareness using a steel square and a surface plate (Fig. 45). Stand the spring and square on end on the surface plate. Slide the spring up to the square. Revolve the spring slowly and observe the space between the top coil of the spring and the square. If the spring is out of square more than k-in, replace it.
Assembly
1. Install each valve (Fig. 46) in the port from which it
|
 **
**